Working with Funds
A friendly heads-up
This article showcases some features available only for those who use Flocknote for online giving and/or subscribe to Flocknote Complete. Learn more about these powerful tools here.
IN THIS ARTICLE
Additional Settings for Online & Mobile Giving
Fund Giving Pages & Reach Outs
Classic Giving
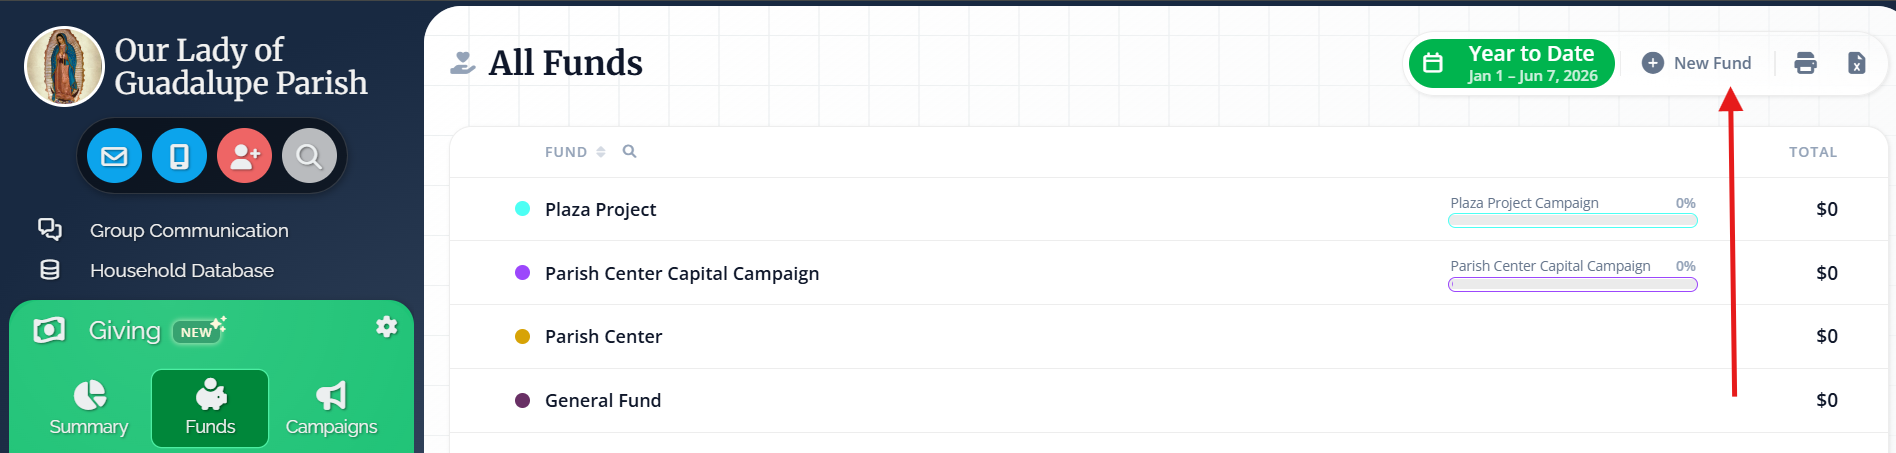
To Create a Fund
Option 1:
- Under the Giving section, select the Funds tab
- From there, click "+ New Fund" in the top right corner
- Fill out the fund details and click the green "+ Create Fund" button. Boom – done!
Option 2:
For churches that have a Flocknote Complete subscription:
1. Go to the People page of a group that contains a member you'd like to record a gift/donation for.
2. Click on the name of the member and select the Giving tab of their profile.
3. Click the green Record a gift button. If you've never added or edited funds, it will default to "General Fund". Highlight it and type over with your new fund name.
4. Provide the rest of the details, click Save, and the fund will be created with the gift record added.

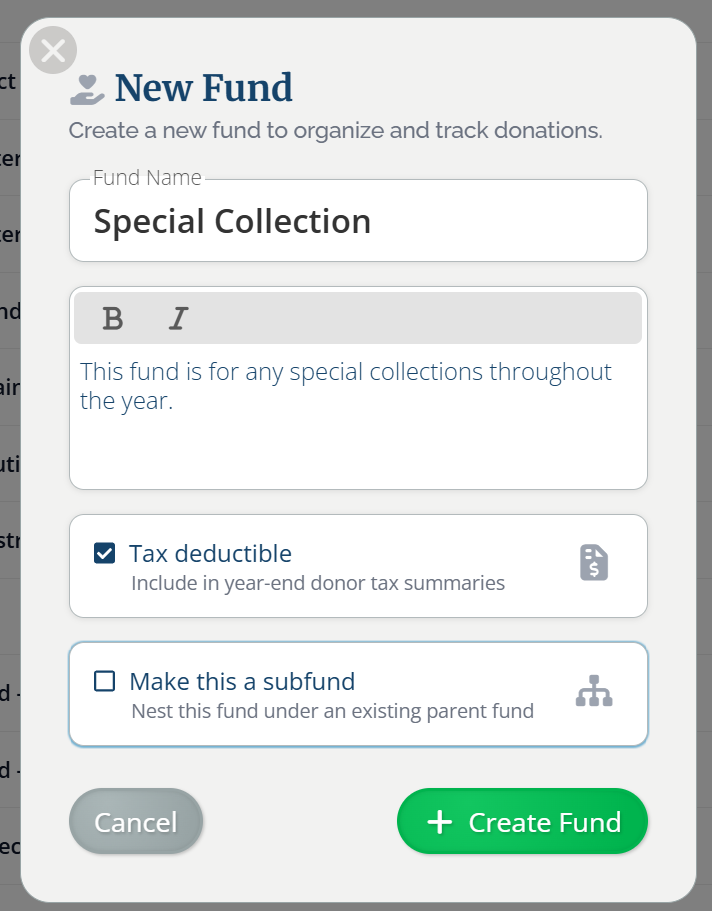
To Create a Sub-Fund
Option 1:
- Under the Giving section, select the Funds tab
- From there, click "+ New Fund" in the top right corner
- Fill out the fund details and check the box that says, "Make this a subfund" and select the parent fund you'd like to nest it under
Please note - once a sub-fund is created, your organization will be permanently upgraded to the new Flocknote Giving tools. The classic version does not support sub-funds and cannot be restored after this change.
- Click the green "+ Create Fund" button. Easy peasy!

Option 2:
- From the Funds tab, click on the existing fund you'd like to nest a new sub-fund beneath
- From the individual fund's page, click the "+ New Sub-Fund" button in the top right
- Fill out the fund details and click the green "+ Create Fund" button. All set!

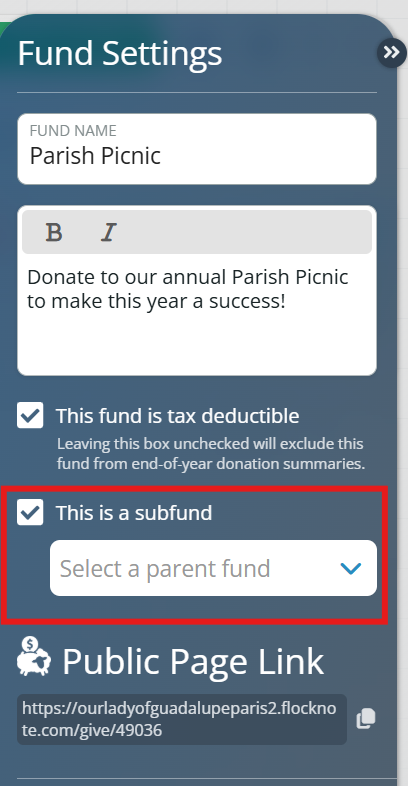
Option 3:
You can make an existing fund a sub-fund by following the steps below:
- From the Funds tab, click on the existing fund you'd like to make a sub-fund
- Click the Settings gear icon in the top right corner
- Within the Fund Settings, check the "This is a subfund" box
- From there, you can select the parent fund under which you would like this new sub-fund to be nested
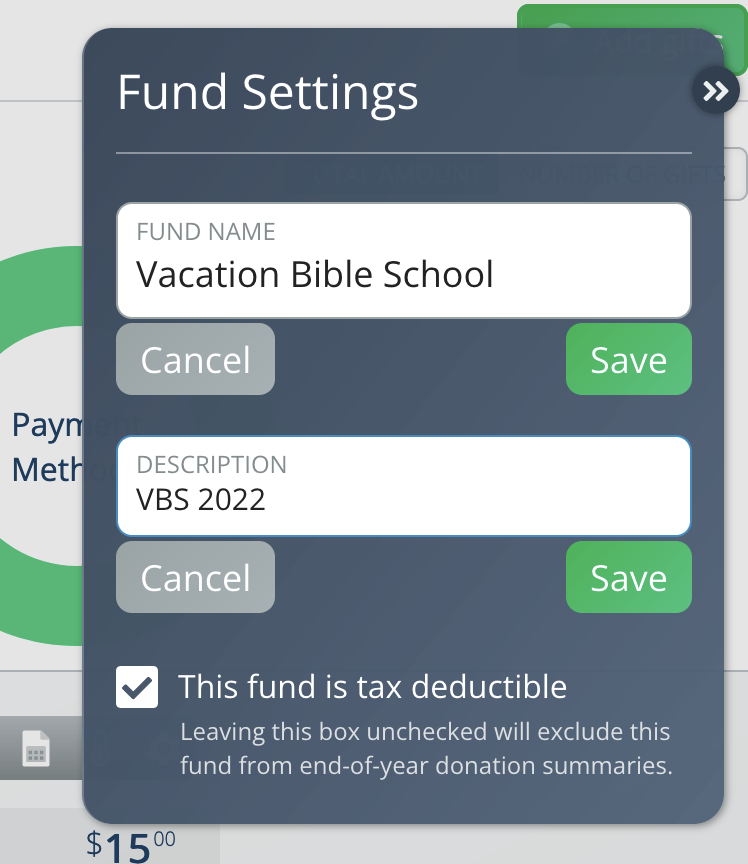
Edit Fund Settings
1. Click on the fund from the list on the main Funds page to expand that fund's details.
2. Set the color that signifies that fund in graphs/charts by clicking the colored circle and selecting your preferred color or entering a hex code. Then click the blue Save button.

3. Then, click the grey cogwheel icon from the taskbar in the top right corner.

4. From here, you can edit the fund's name, provide a brief description, and set the tax-deductible status.
Please note: Funds that are not marked as tax-deductible will be excluded from end-of-year donation summaries.
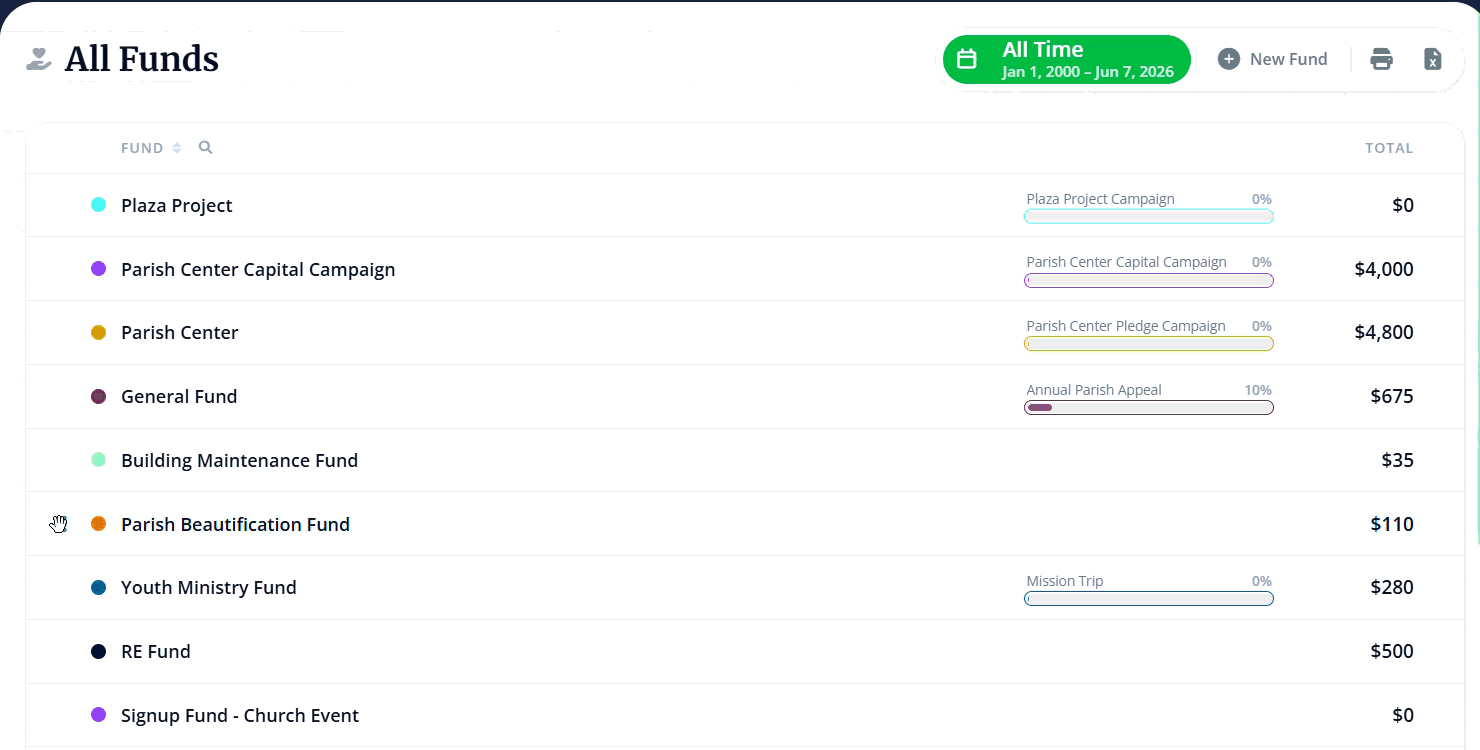
To Rearrange Fund Order
By default, your funds will be organized by creation, with the most recently created funds at the bottom of the list
Option 1:
- Within the All Funds page, click FUND (next to the search icon) to organize your funds in alphabetical order (A-Z)
- Click FUND once more to alphabetize backwards (Z-A)

Option 2:
You can also rearrange the default order by dragging and dropping each fund in the list to the spot you prefer.
To Delete a Fund
1. Click on the fund name from the list of funds on the main All Funds page to expand that fund's details.
2. Click the grey cogwheel icon from the taskbar in the right-hand corner.

3. Click the Delete Fund button. (If the fund has gifts recorded, the system will ask you to transfer those gifts to another fund. Select the fund from the dropdown and then click Delete fund and transfer gifts).

Fund Giving Pages & Reach Outs
Churches that have our Online & Mobile Giving enabled will see a blue Share button beside each of their funds' unique URL. You'll have the option to:
- Email the donors who have given to this fund in the past
- Send an email to invite members to give to this fund
- (or click the "Send a Note" button)
- Send a text to invite members to give to this fund
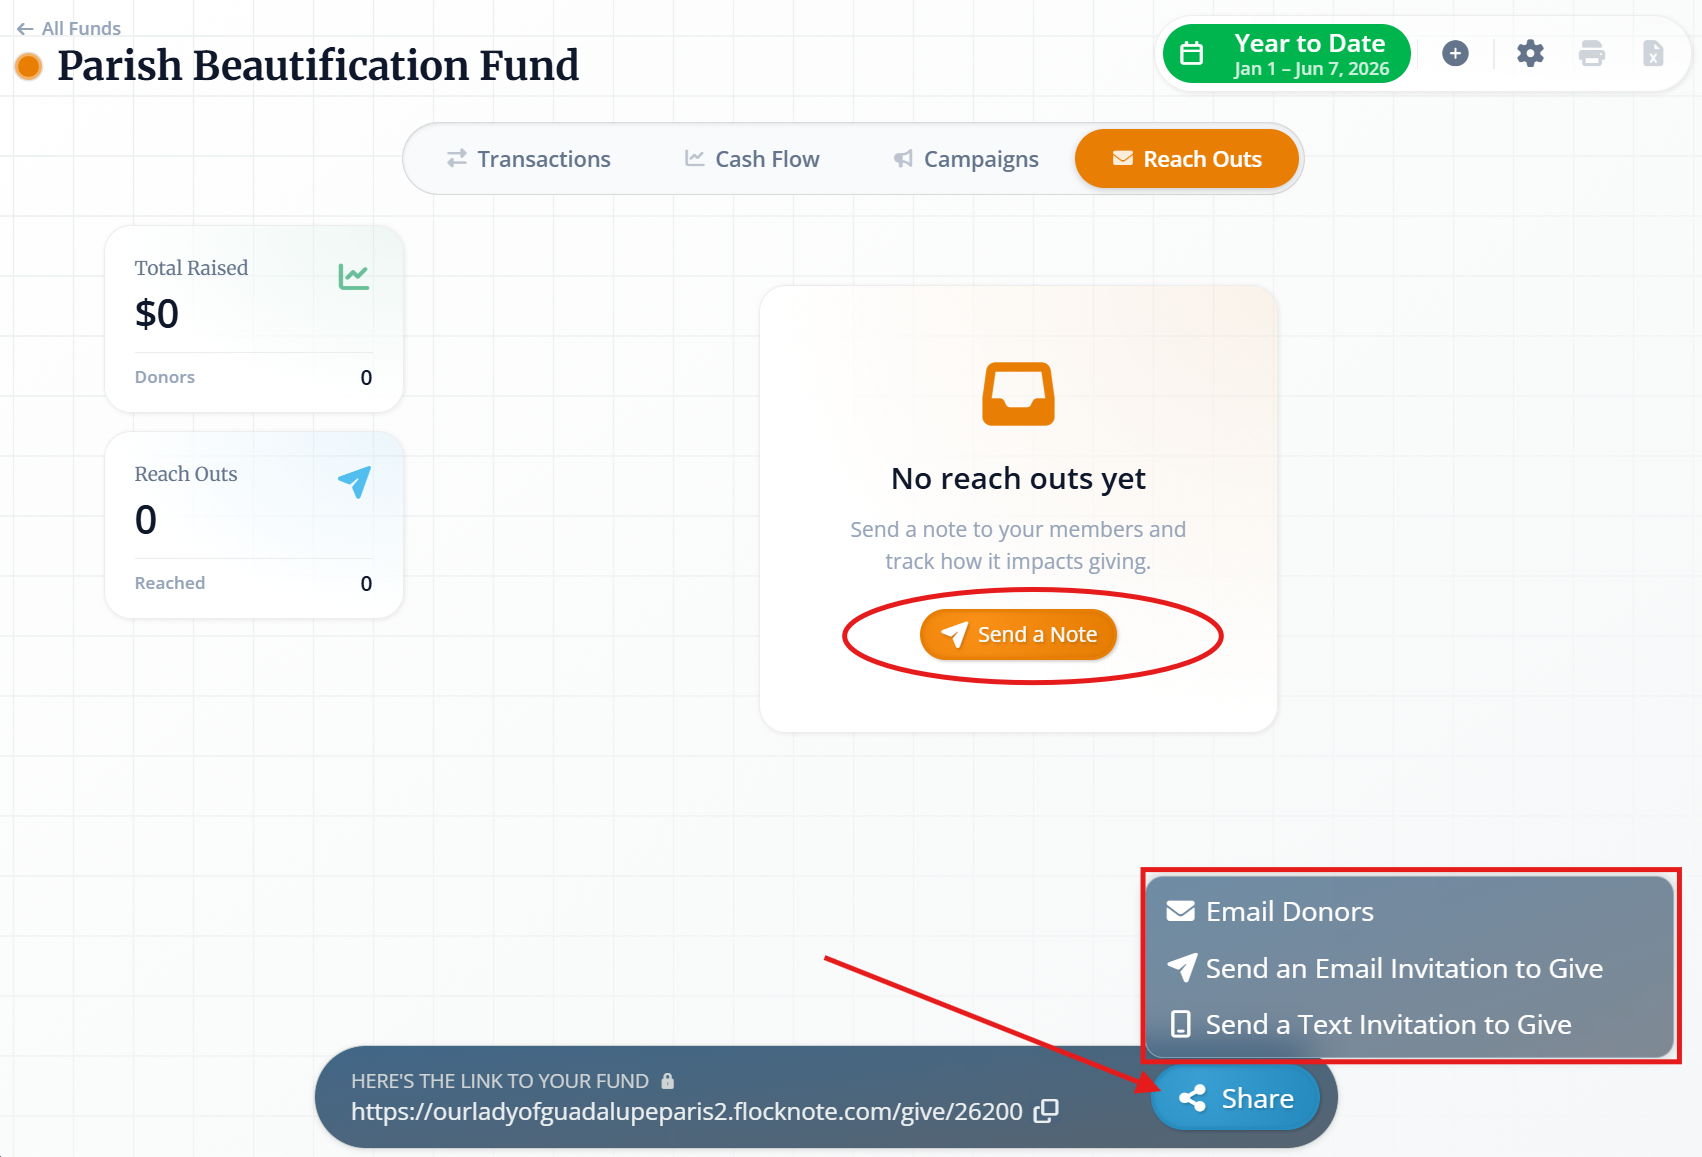
These individual funds' giving pages can be shared easily with your members by copying the unique URL and then sharing that link on your church website, social media, or anywhere you'd like!
💰 With Online & Mobile Giving enabled, members can access all their giving information in one convenient place: the Member Giving Page. This unique page for your church lets members give to your funds, view their giving history, tax statements, active pledges, and recent transactions. Learn how to set up your Member Giving Page here.
To Create a New Fund (Classic)
Option 1:
This option will only be available if you've already added any gifts/batches in the past.
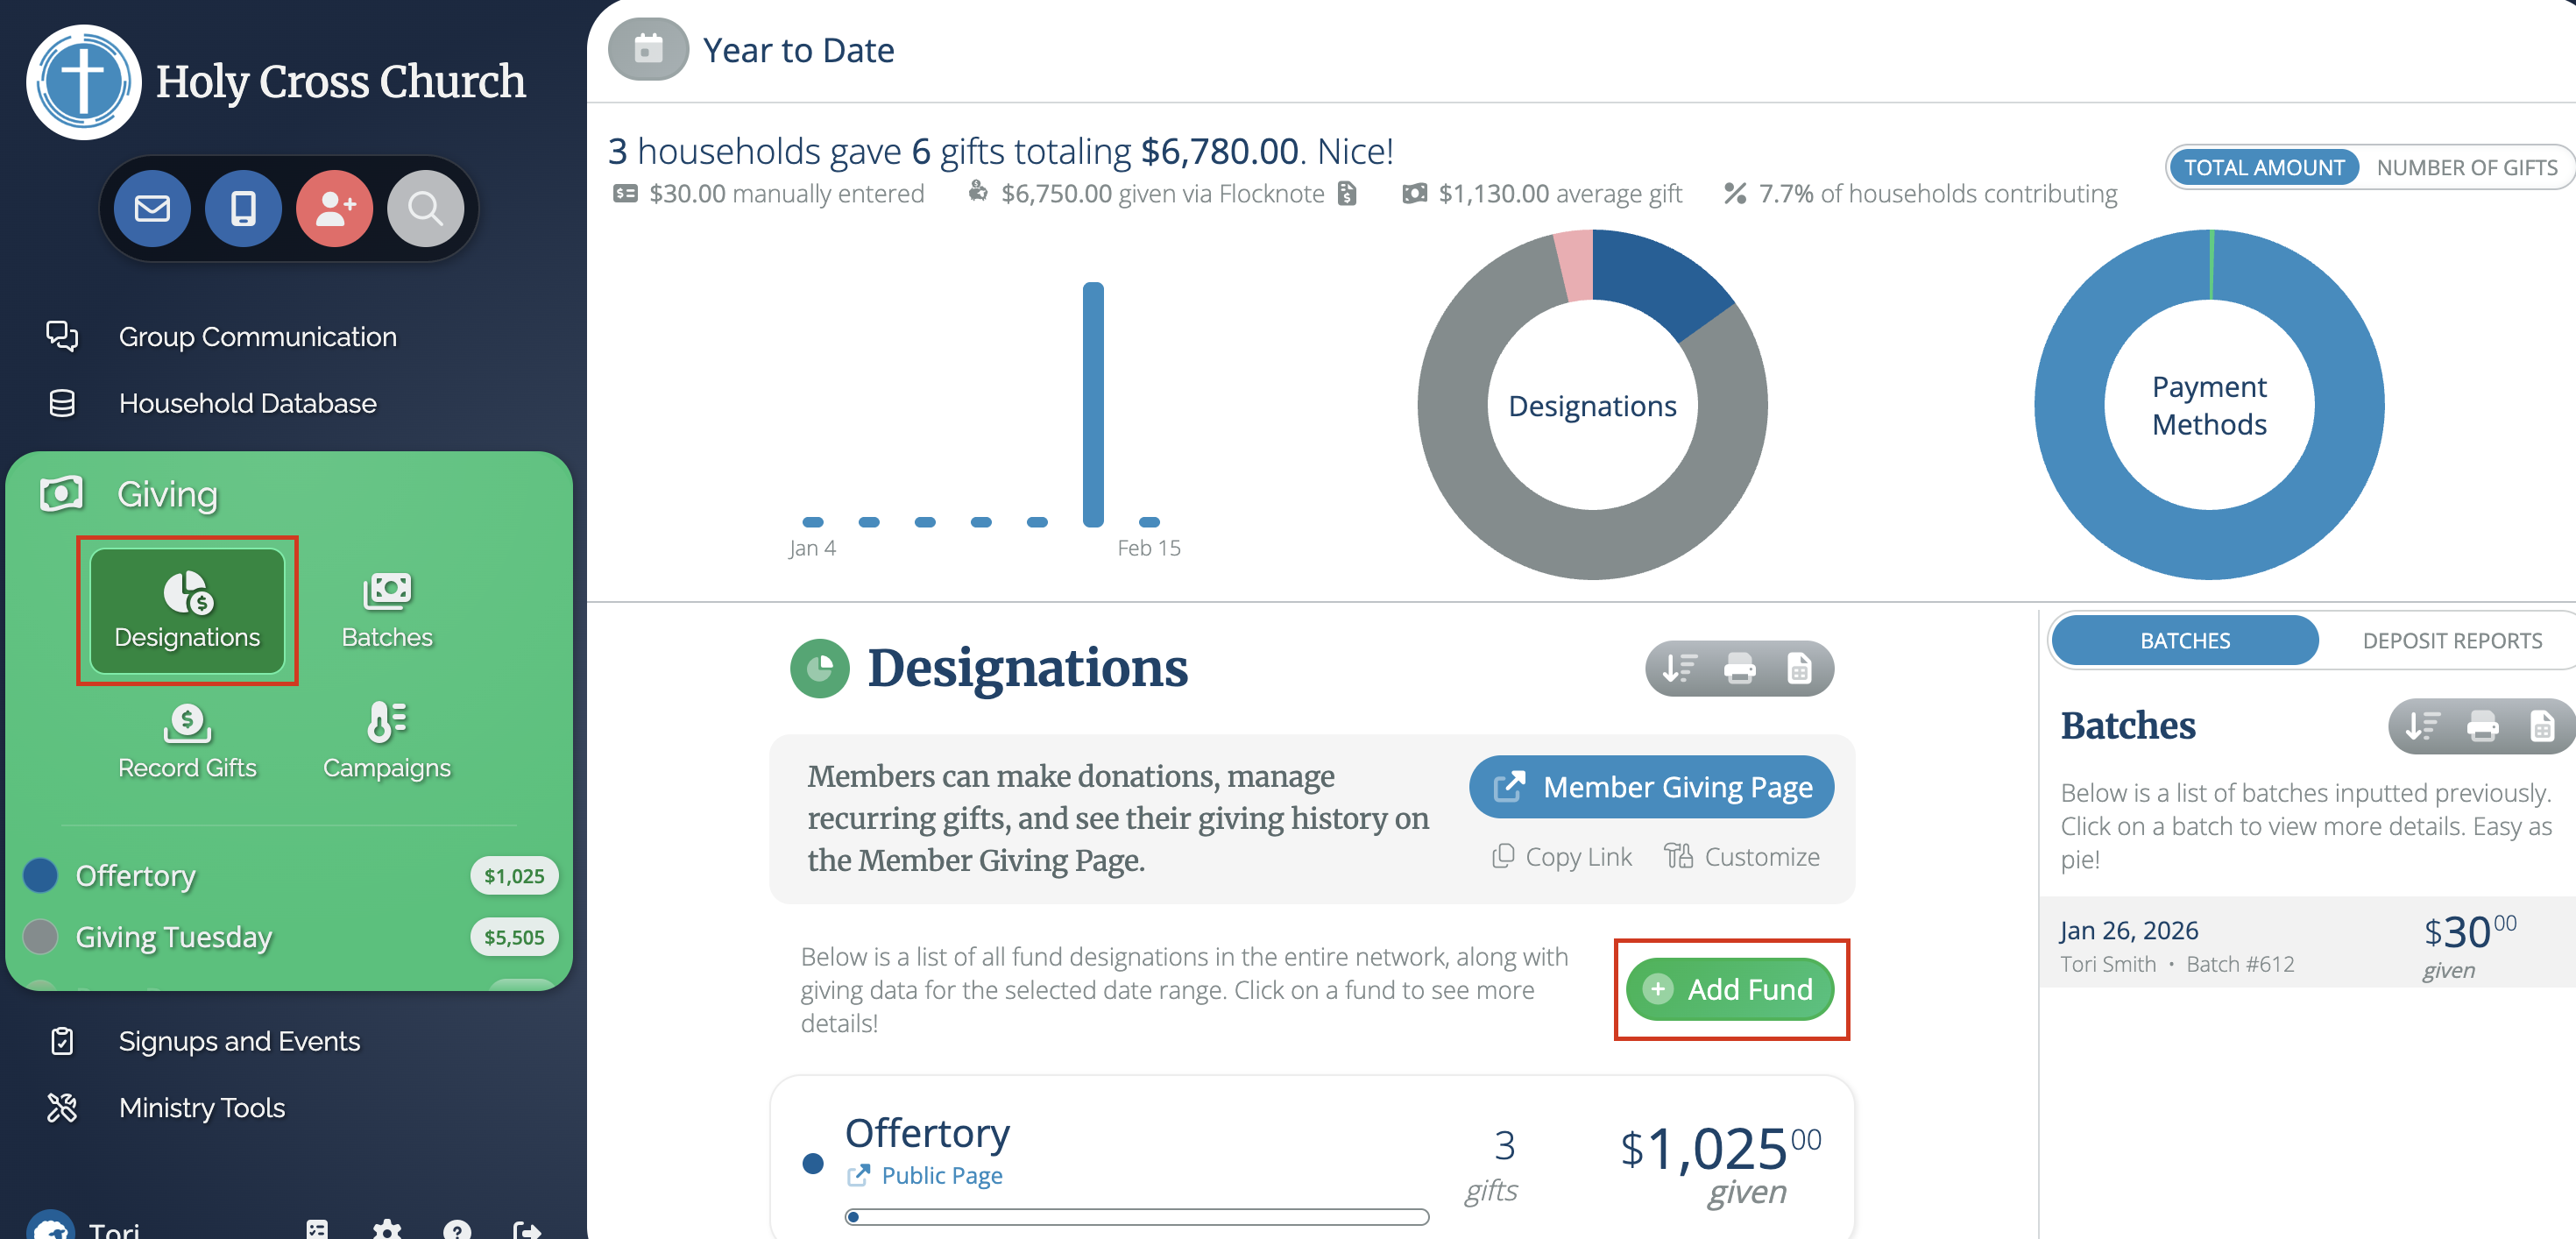
1. Go to the Giving section on the left-hand side bar and select Designations (Funds).
2. Click the green + Add Fund button at the top.
3. Fill out the fund details and click the gray Save button. Boom – done!

Option 2:
For churches that have a Flocknote Complete subscription:
1. Go to the People page of a group that contains a member you'd like to record a gift/donation for.
2. Click on the name of the member and select the Giving tab of their profile.
3. Click the green Record a gift button. If you've never added or edited funds, it will default to "General Fund". Highlight it and type over with your new fund name.
4. Provide the rest of the details, click Save, and the fund will be created with the gift record added.
Edit Fund Settings (Classic)
1. Click on the fund name from the list of funds on the main Giving page to expand that fund's details.
2. Set the color that signifies that fund in graphs/charts by clicking the colored circle and selecting your preferred color.

3. Then, click the grey cogwheel icon from the taskbar.

4. From here, you can edit the fund's name, provide a brief description, and set the tax-deductible status.
Please note: Funds that are not marked as tax-deductible will be excluded from end-of-year donation summaries.

Additional settings for our Online & Mobile Giving users:

Churches using our online giving features will see these additional options in the Fund Settings:
- Hide this fund's Public Page—check this box to choose not to include this fund on your church's Manage My Giving page. Members will not be able to give directly to this fund online, but you can still apply gifts to this Fund internally.
- Allow recurring gifts to this fund—check this if you'd like members to set up a recurring gift for this fund. Click HERE to learn more about setting up recurring giving.
- Hide confetti after a successful payment—This is a playful, fun feature we added to delight and surprise your members with a screen full of confetti after making a successful payment or gift. You can turn confetti on or off, depending on whether confetti is appropriate when giving to this fund.
- Show a custom message after a payment has been made—use this to create a custom thank you or additional message when a payment has been made to your fund.
- Public Page Link—Use this unique URL to direct members to give online to this fund.
- Enable Text-to-Give to this Fund—Check this box to set up a Text-to-Give keyword that members can use to give a predetermined amount towards this fund.
- Allow adding a memo—This setting will allow members to write a memo with their payment.
- Payment Type—Use this dropdown menu to select the right word for this transaction. Is it a donation, gift, or payment?
- Suggested Amounts—When members visit the Public Page for this fund, they will be given these suggested amounts to choose from (or they may enter their own amount). You can adjust these numbers, or remove some or all of them to change what is suggested.

- Add-On Gifts—Allow members to cover the transaction fees (can be required or optional), and suggest other add-on gifts to different funds in your network. You can have up to three add-on gifts per fund.
- Unique QR Code and Promo Flyer— Click this option to download a unique QR Code (PNG file) for members to scan and access the fund's giving page. Click Promo Flyer to download and print out a pre-made flyer to put in your bulletin or around your church for members to give directly to this fund.
To rearrange fund orders (Classic)
Select the Sort button to sort the order of the funds based on name, the amount given, or the number of gifts.

You can also rearrange the default order by dragging and dropping each fund in the list to the spot you prefer.

To Delete a Fund (Classic)
1. Click on the fund name from the list of funds on the main Giving page to expand that fund's details.
2. Click the grey cogwheel icon from the taskbar.
3. Click the Delete Fund button. (If the fund has gifts recorded, the system will ask you to transfer those gifts to another fund. Select the fund from the dropdown and then click Delete fund and transfer gifts).
Giving Pages (Classic)
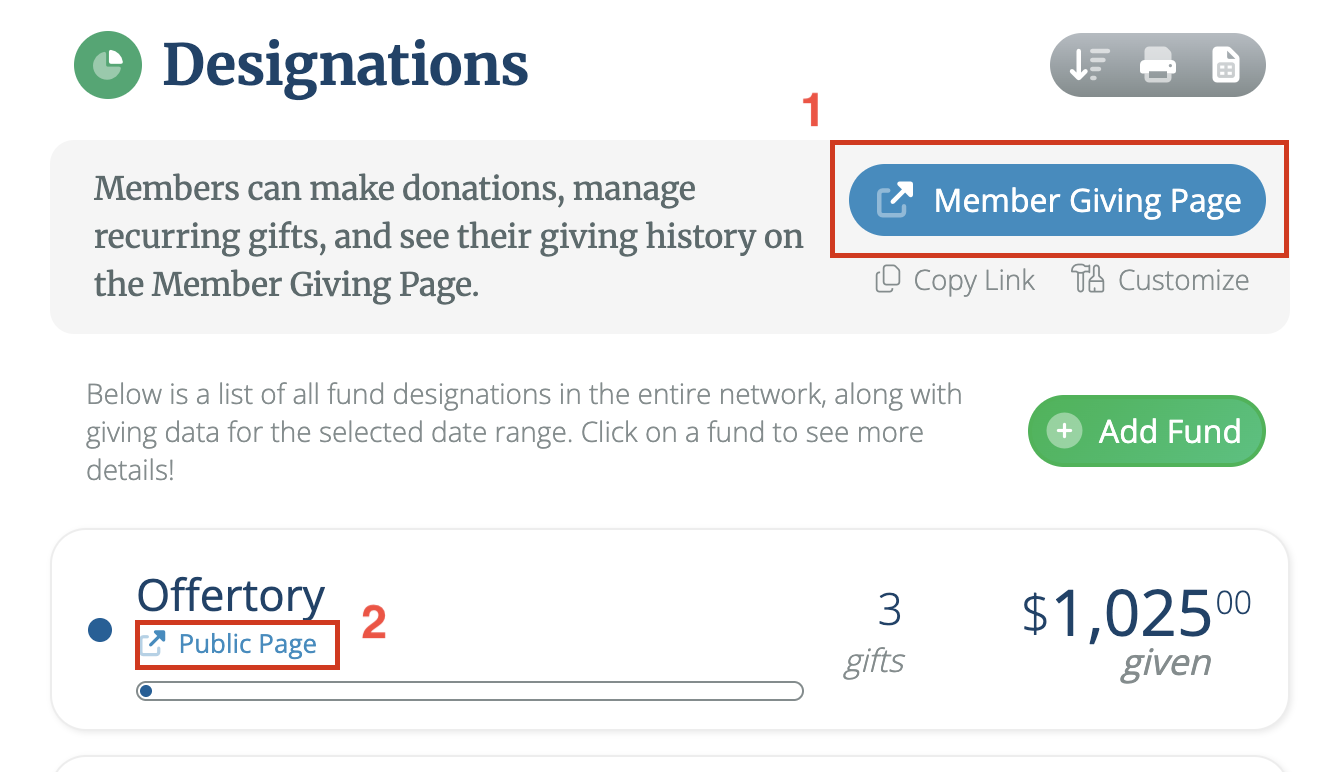
Churches that have our Online & Mobile Giving enabled will see blue Public Page buttons beside each of their funds, as well as a main blue Member Giving Page button at the top of their list of funds. You can customize the Member Giving Page with your Church's branding and logo. Learn more HERE.
- Member Giving Page - Clicking this blue button will bring you to the unique page for your church that displays links to give to each of your funds. Members who visit this page can log in to give a donation, view their giving history, tax statements, active pledges, and recent transactions.
- Public Page - beside individual funds - Clicking this blue button will bring you to the unique page members can use to give to this specific fund.
These pages can be shared easily with your members by copying the unique URL and then sharing that link on your church website, social media, or anywhere you'd like!
Questions? Don't hesitate to reach out to us at help@flocknote.com