How do I record gifts/donations?
Flocknote Complete
This guide showcases features available only for those subscribed to our all-in-one software solution, Flocknote Complete. If you would like to learn more about these exciting features, click HERE. 🎉
Please note, that networks with our Flocknote Starter package and online giving enabled, but not Flocknote Complete, are unable to manually record gifts/donations as shown in this guide. Networks with Flocknote Complete, which have online giving enabled, can record gifts manually and collect payments directly through Flocknote. Learn more about collecting payments with our Online Giving feature here.
IN THIS ARTICLE
Edit, Add more gifts, or delete a batch
Edit a batch entry for a member
Classic Add Gifts in Batches
Classic Import Gifts via Spreadsheet
Classic Edit or Delete a Batch
Classic Edit a batch entry for a member
Classic Splitting Transactions
Add Gifts in Batches
While you can add individual gifts via the Giving tab of individual member profiles, you can add gifts for multiple members in bulk batches by selecting Record Gifts under the Giving tab.
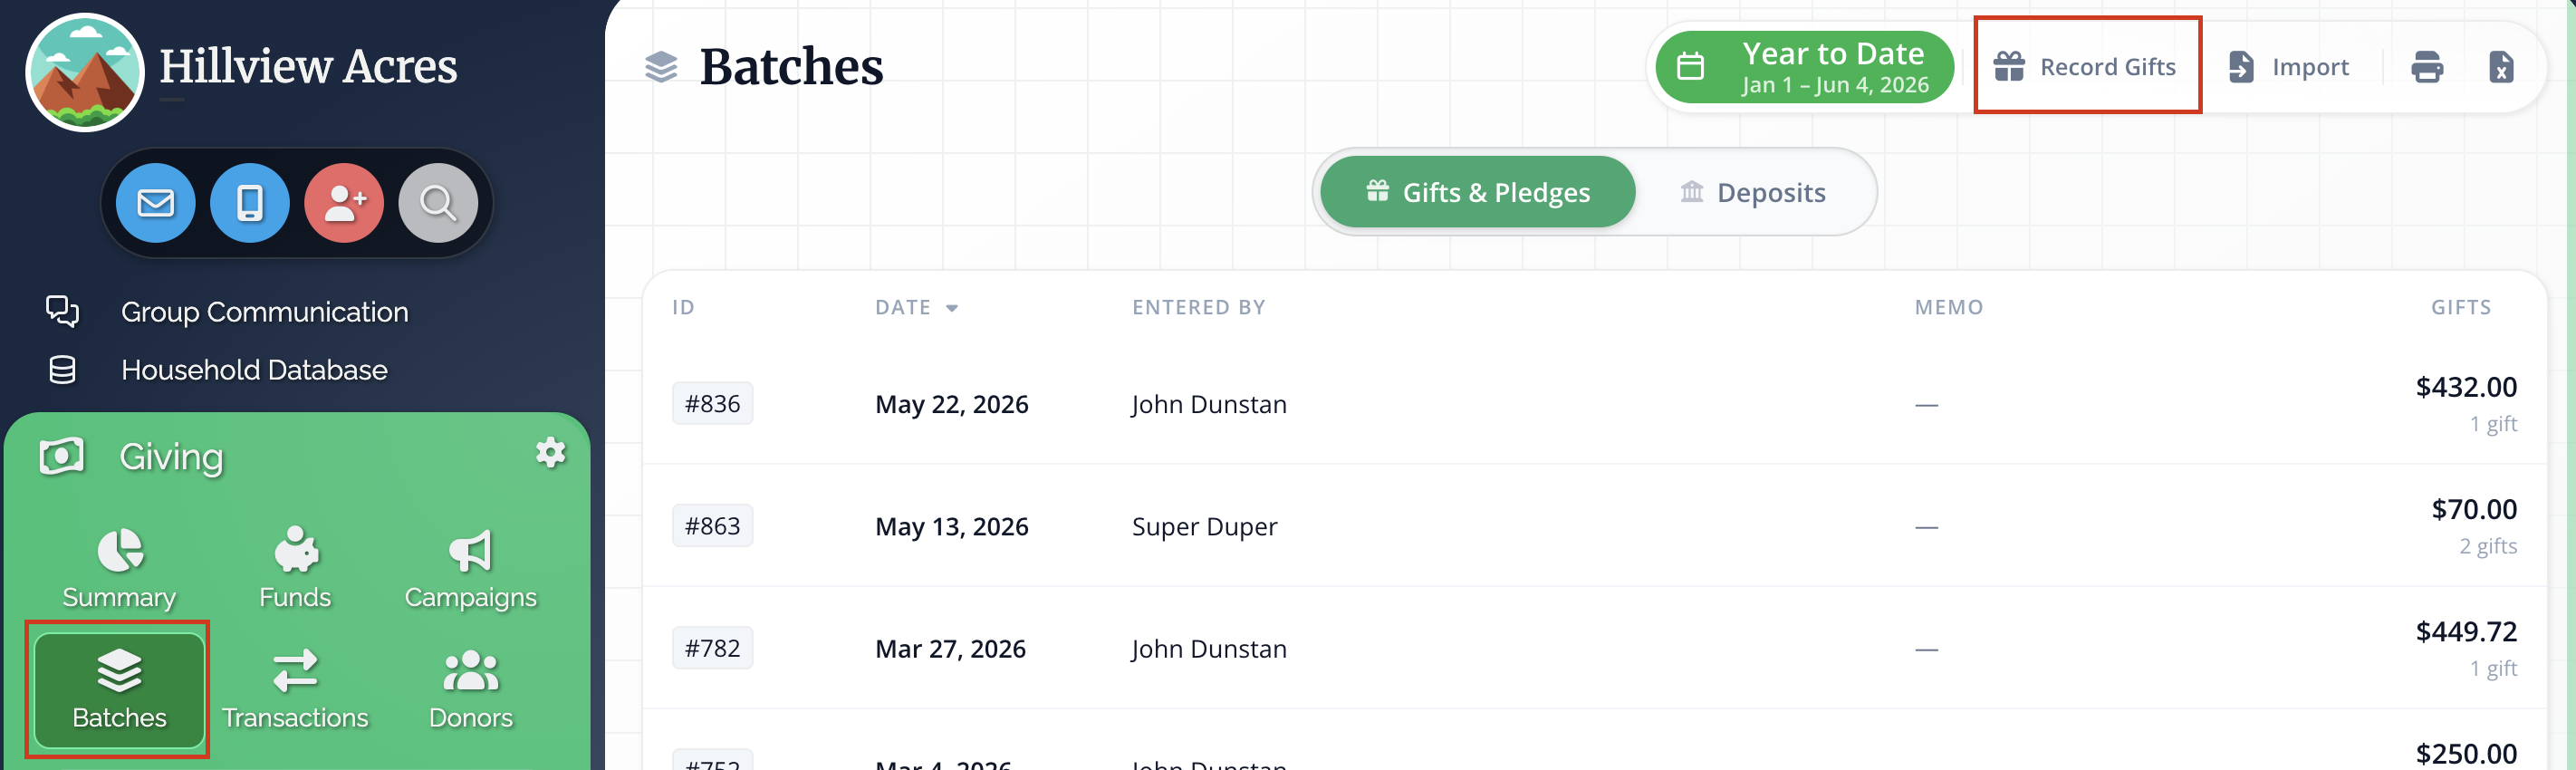
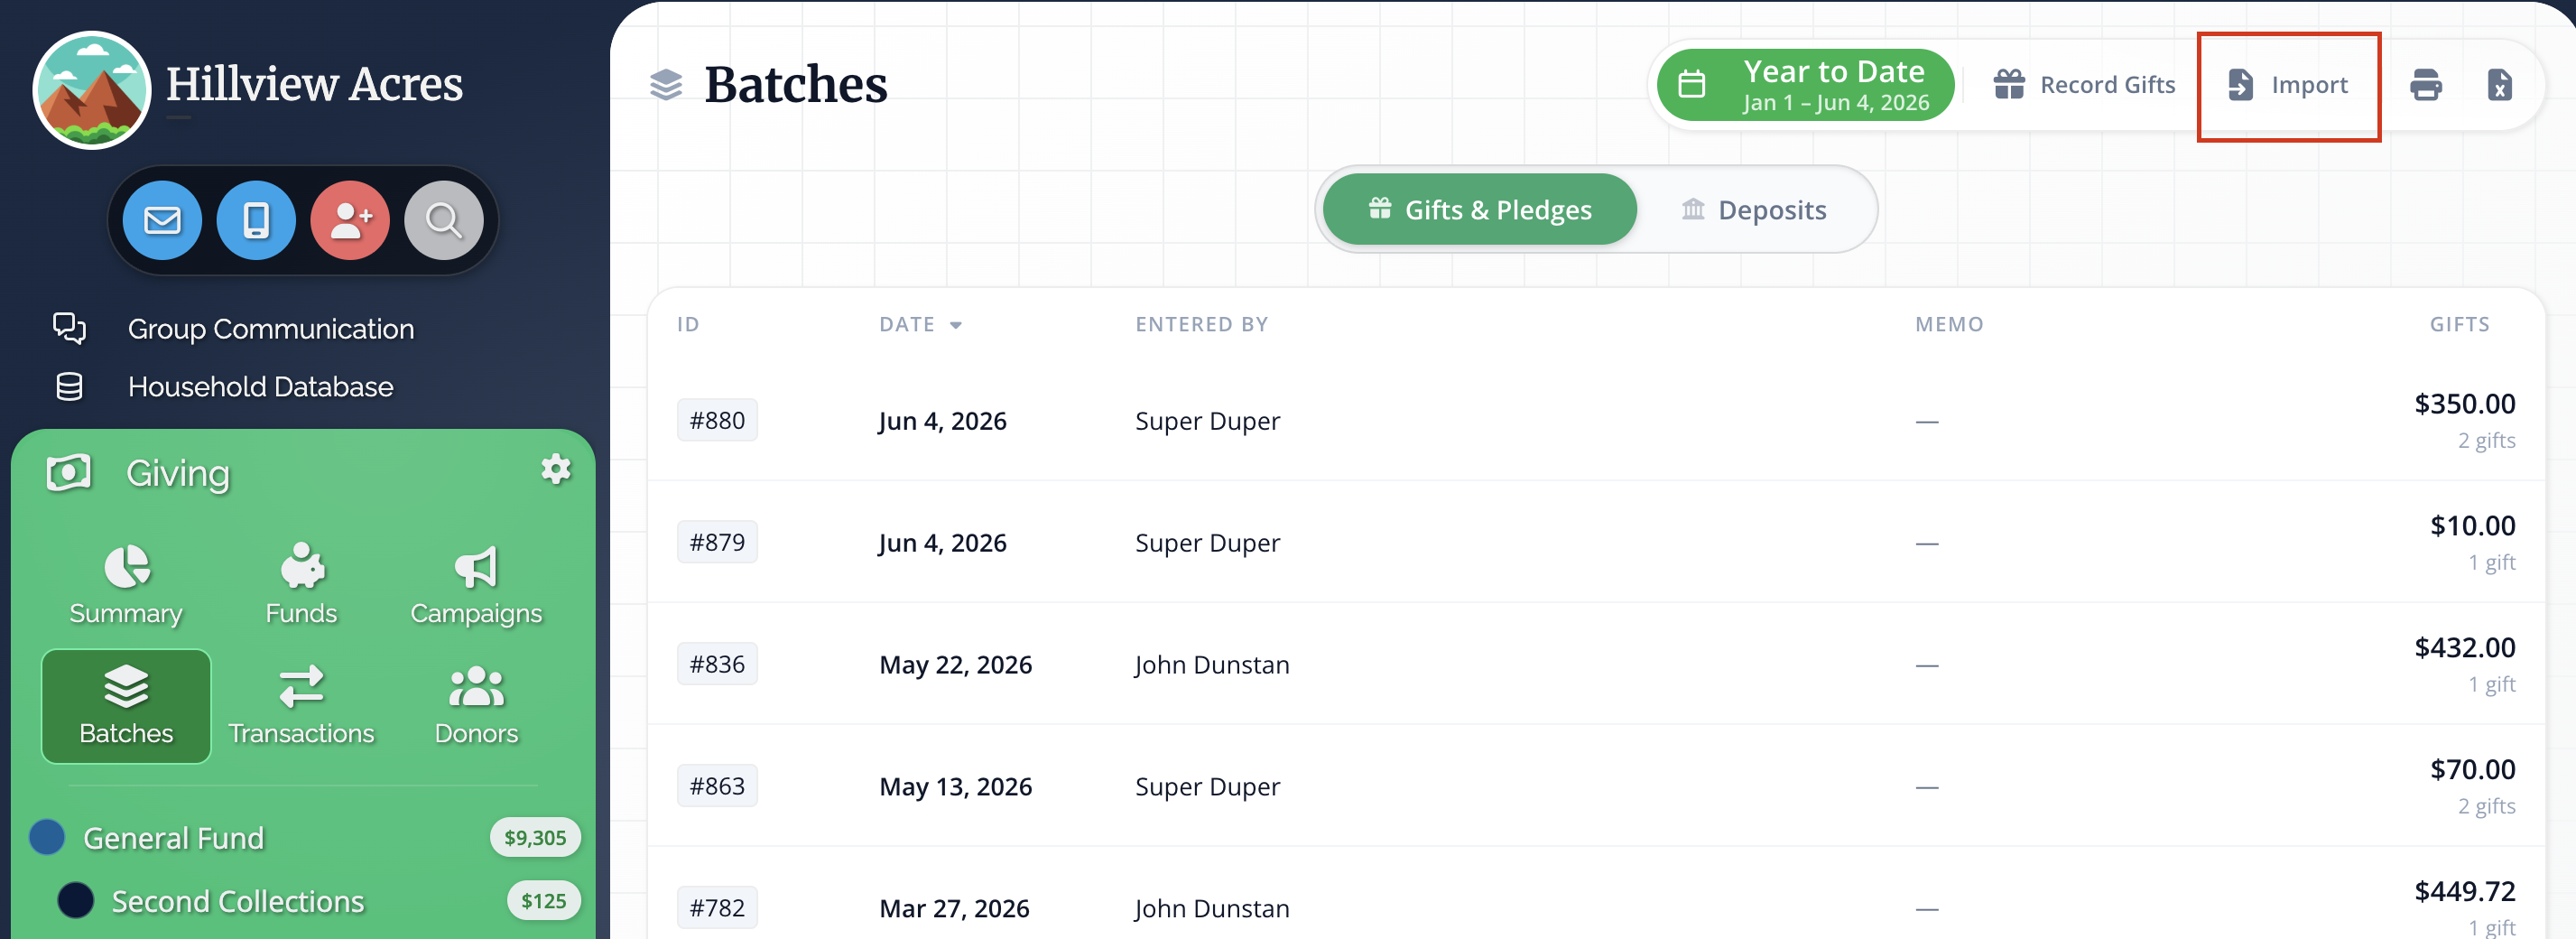
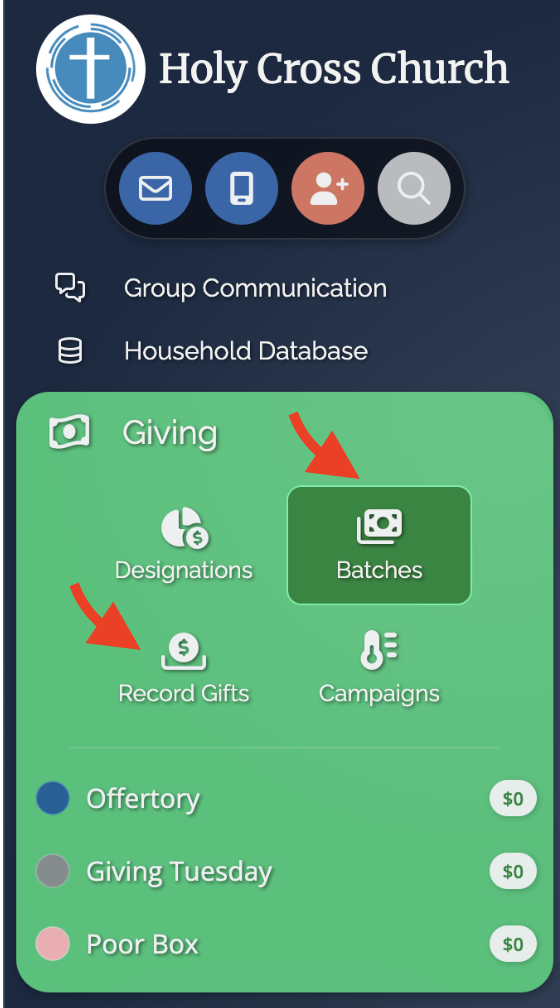
To add or review gifts in bulk, aka in a batch, start by selecting the Giving section on the left-hand side panel. From there, select Batches and click Record Gifts at the top right of the page.
- First, adjust the date at the top right and click the + Memo button to add a memo to the batch.
- Start your batch by searching for the first donor in the search box:
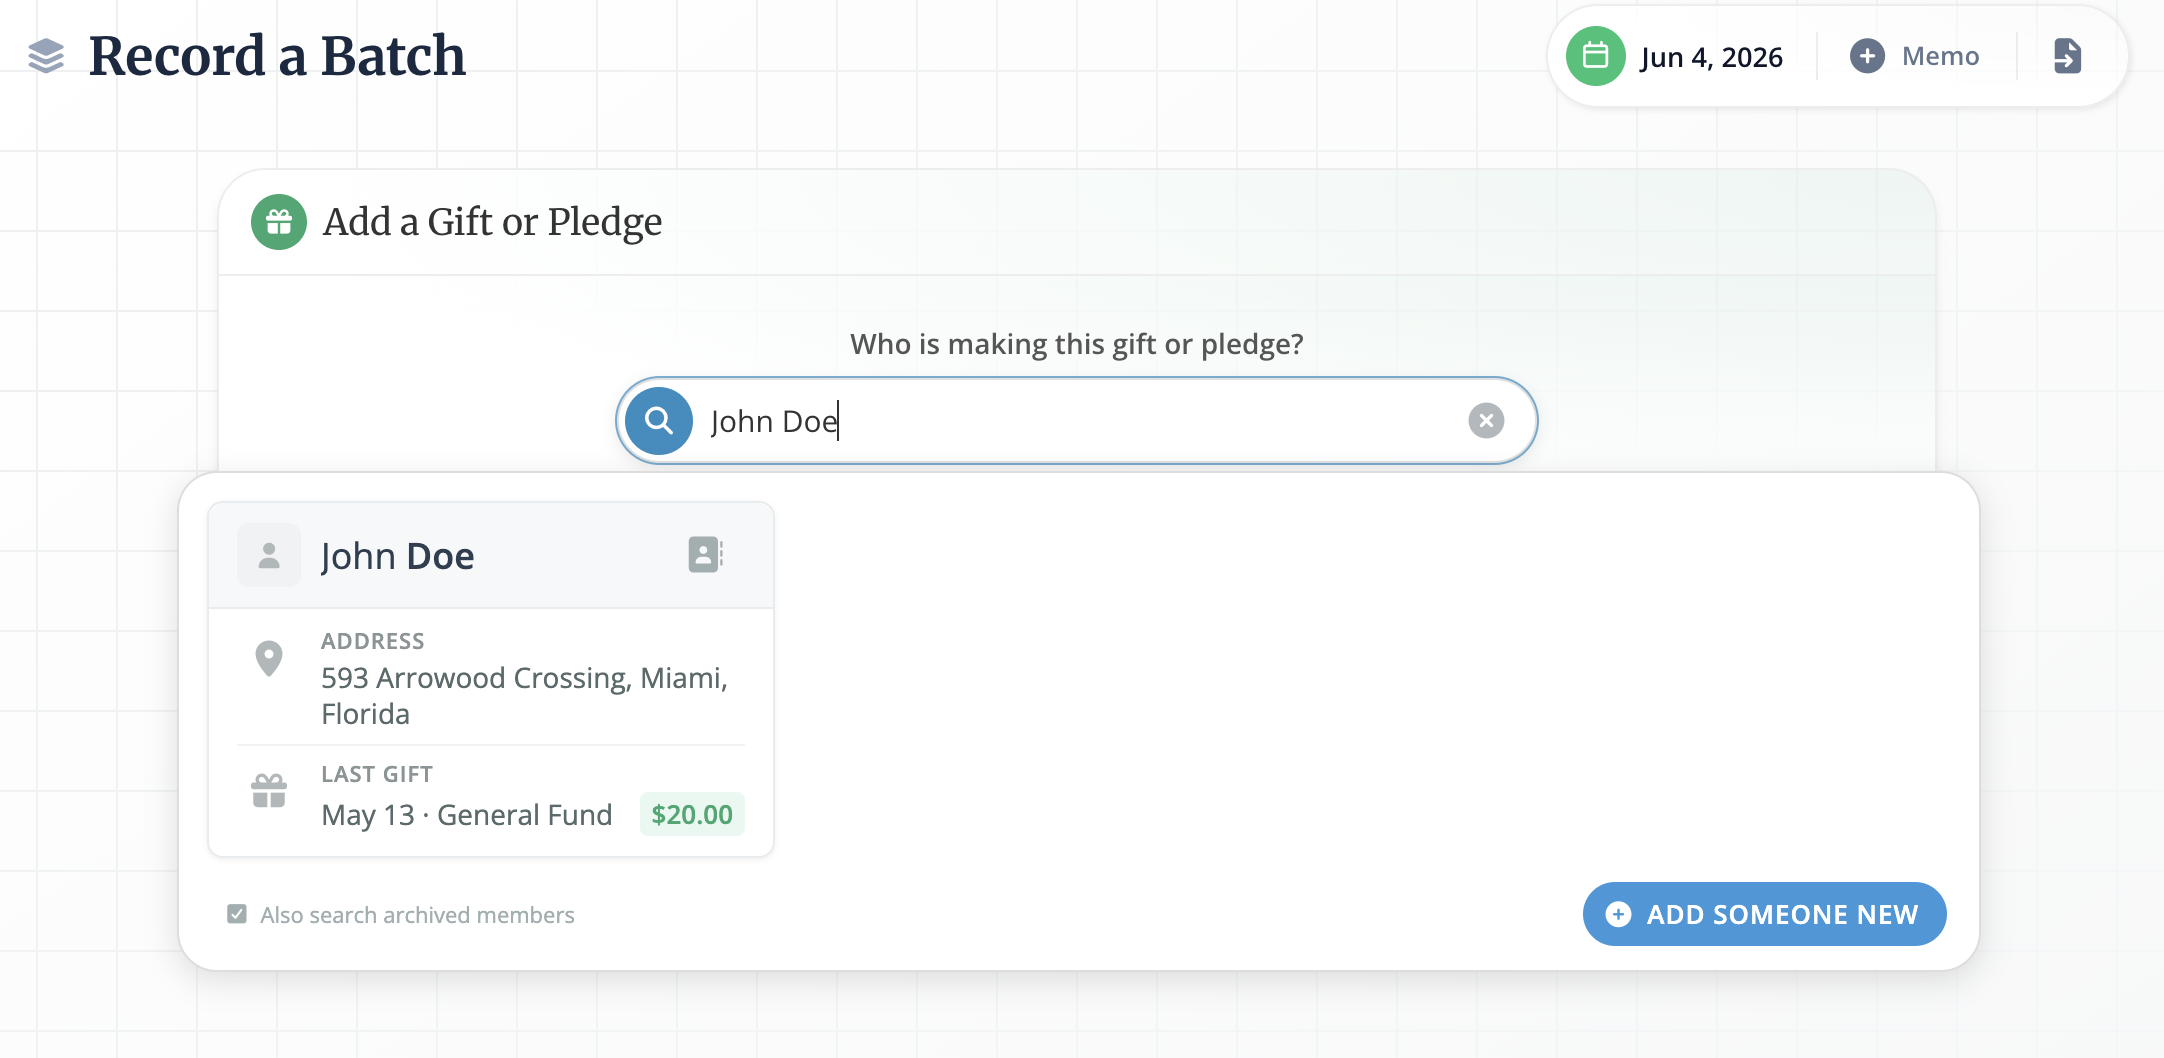
- Click on the member that matches your search. You can search for a member by name or envelope number.
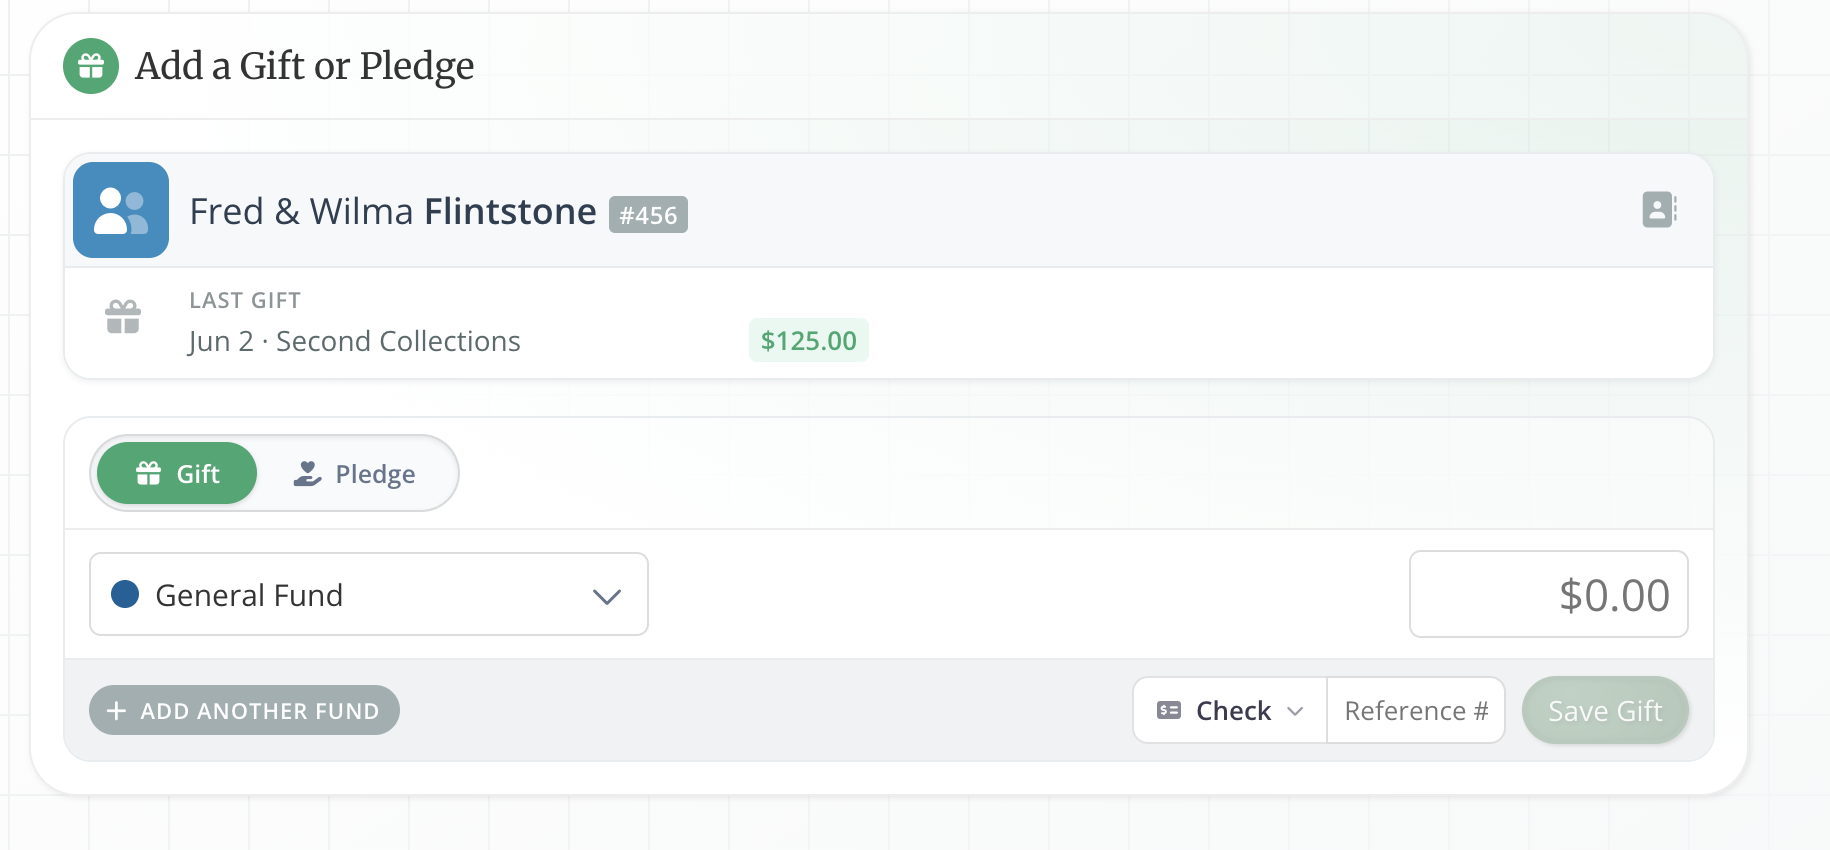
- Once you've selected the member you'd like to record a gift for, you'll notice a few things and customization options:
- The first thing you'll see is if/when that member last gave a gift. Hint: If this member gives regularly via cash or check, this is a great indicator that they'd be a perfect candidate for Online Giving, so they can set up a gift and not have to worry about carrying cash or check each week.
- You can select whether or not this member gave a gift or made a pledge. If you select Pledge, you can include an initial gift.
- You can select the fund through the drop-down menu.
- Add the gift amount to that fund.
- Select the payment method and include any reference numbers if applicable.
- Select Add Another Fund if the member donated to more than one fund.
- Click Save Gift once you've completed adding a donation for this member.
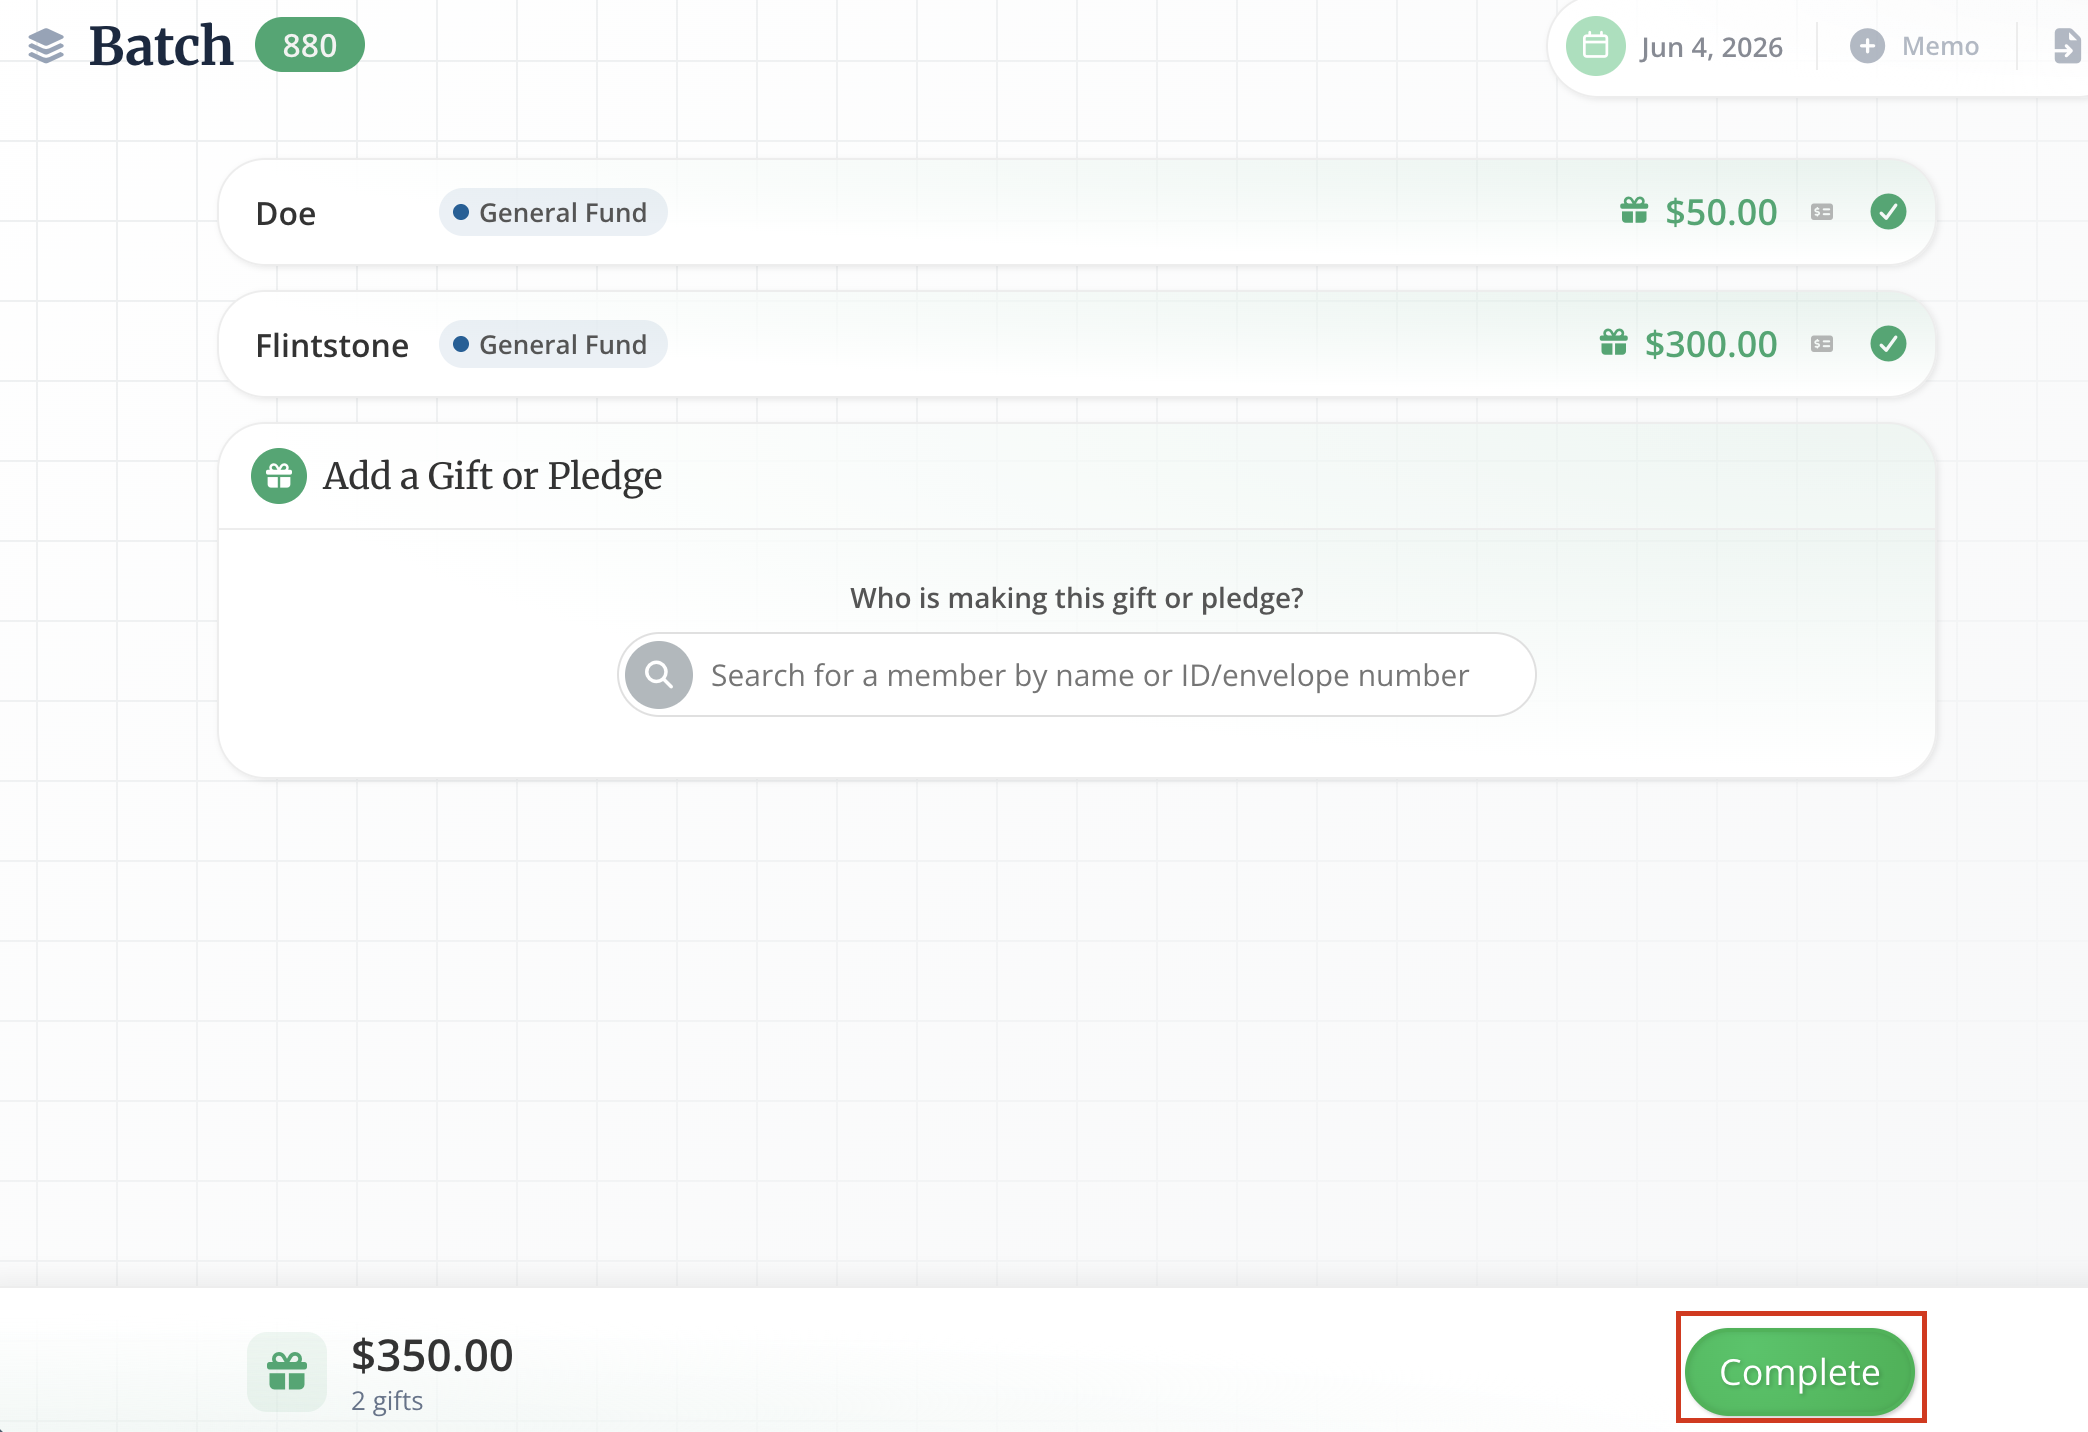
After you've finished adding all of the gifts for members and have clicked Save Gift, you'll click Complete to finish the batch.
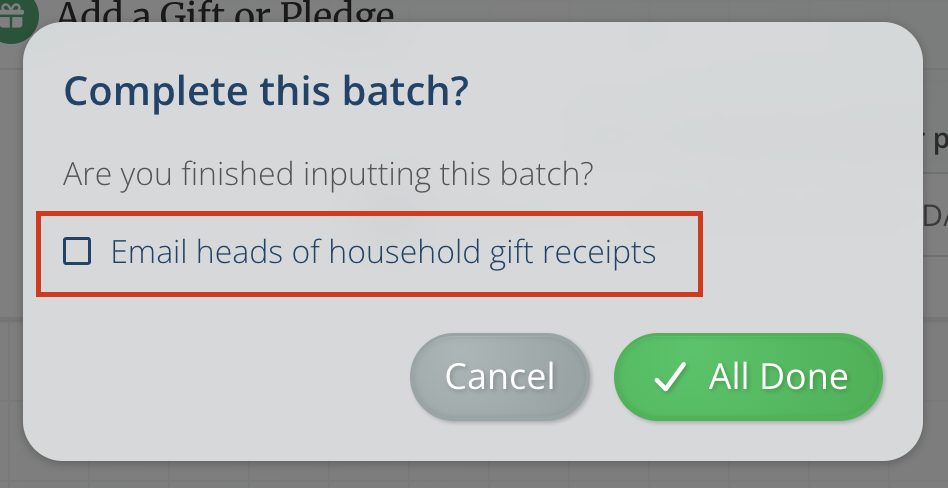
The final screen will give you the option to email the Head of Household's gift receipts. Once you've made your selection, click All Done!
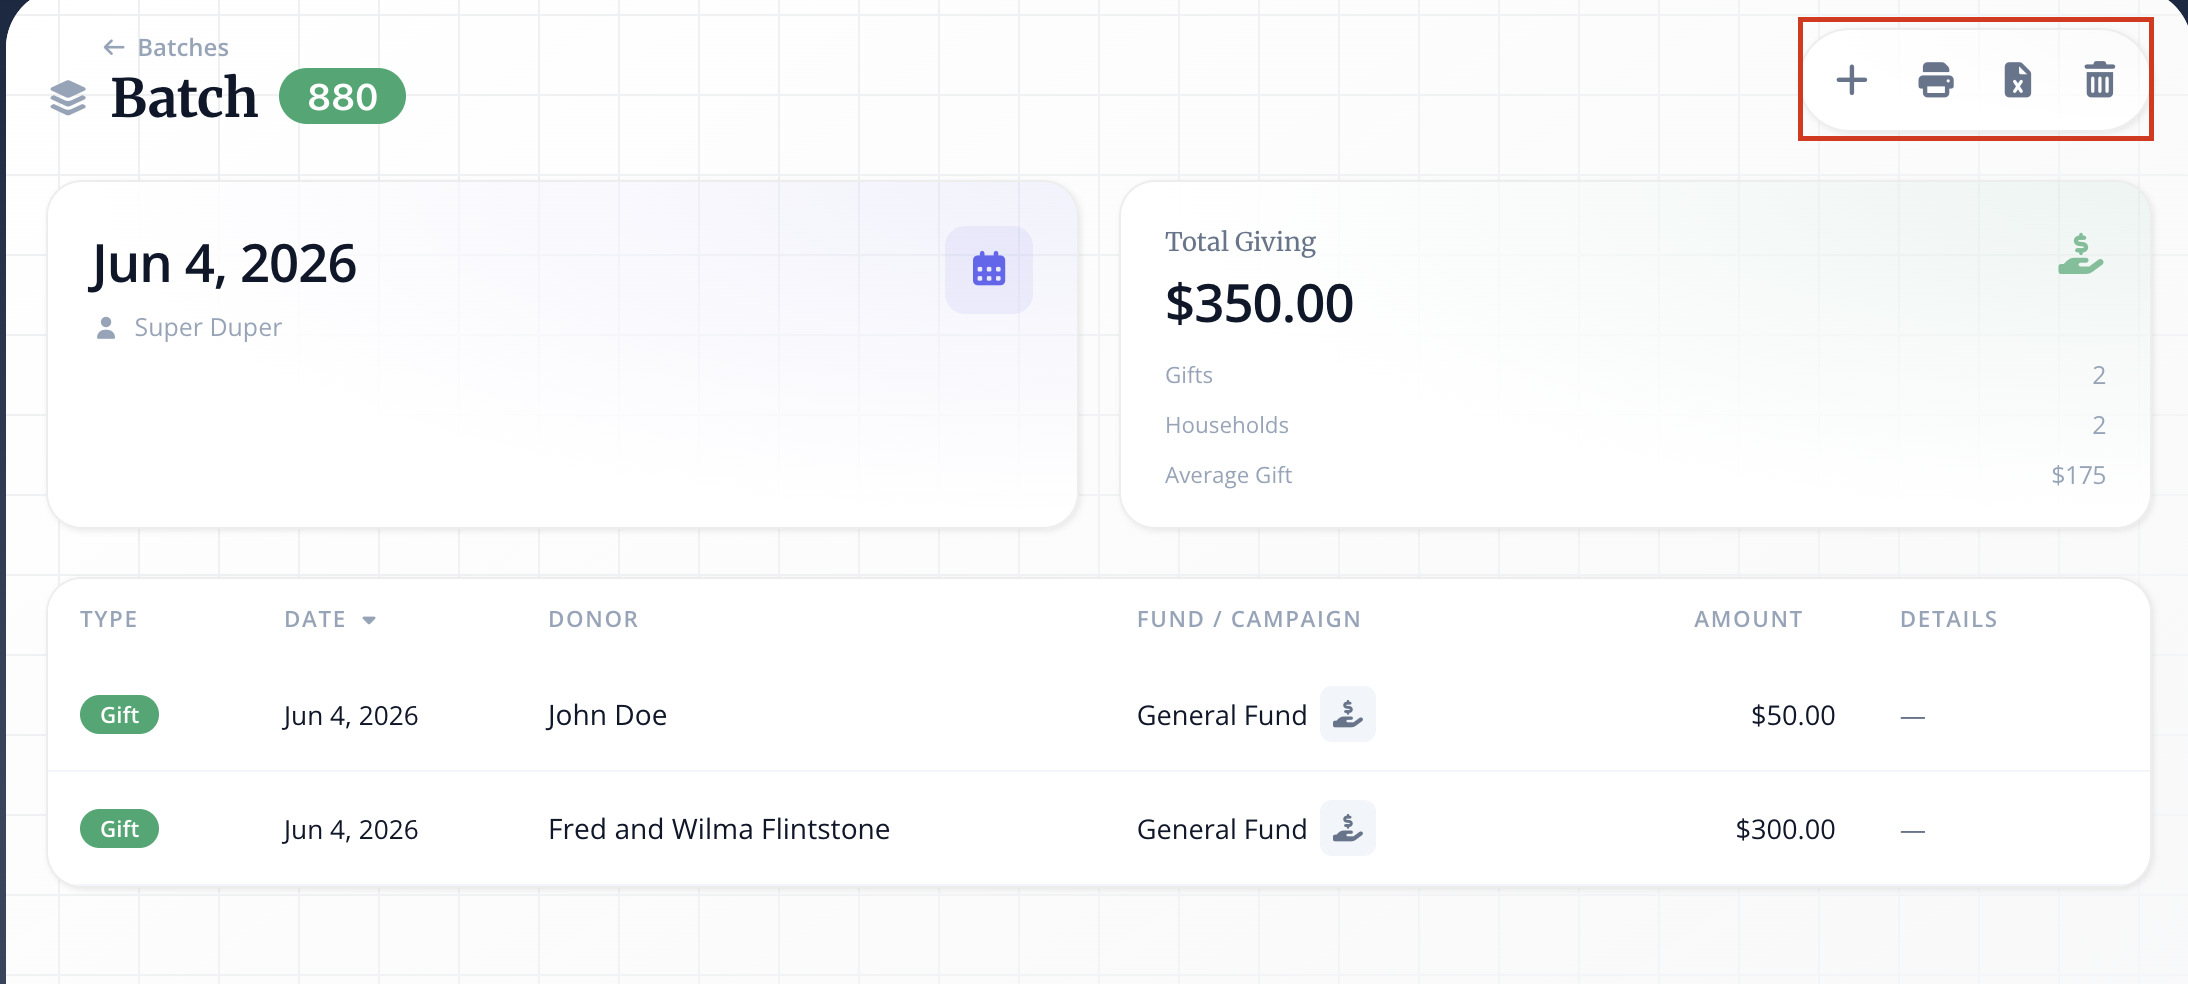
You'll be directed to the Batch Summary page, where you can view the gifts you added, add additional gifts, print a summary, export a spreadsheet, or delete the batch.
Import Gifts via a Spreadsheet
If you decided to import gifts, upload the file (in CSV or .XLSX format) from your computer (see example below). Please note that the only columns needed are envelope number, fund designation, and the dollar amount given. You can also have a column for payment type and specific dates. You can also set it as one date by adjusting the Batch Date (see picture above).
We recommend formatting your spreadsheet like this:

If you've already added envelope numbers to all members' profiles that you're importing gifts for, your spreadsheet can look like this:

🚨IMPORTANT NOTE: Giving data is recognized by envelope number. If you have not added envelope numbers to member profiles, you will need to format your spreadsheet with an envelope number column + an email address column to identify the number and tell the system to add that envelope number to their profile. If you import data for an envelope number that does not yet exist in your network and you do not include an email address to attach it to, the data will not be added to a profile until that specific envelope number has been assigned. Once it's assigned, all historical imports with that envelope number will be added to that specific member's profile or household at that time.
Edit, Add More Gifts, or Delete a Batch
We all make mistakes! We've made it so you can easily edit the date of a batch, add more gifts to a batch, or delete a batch altogether.
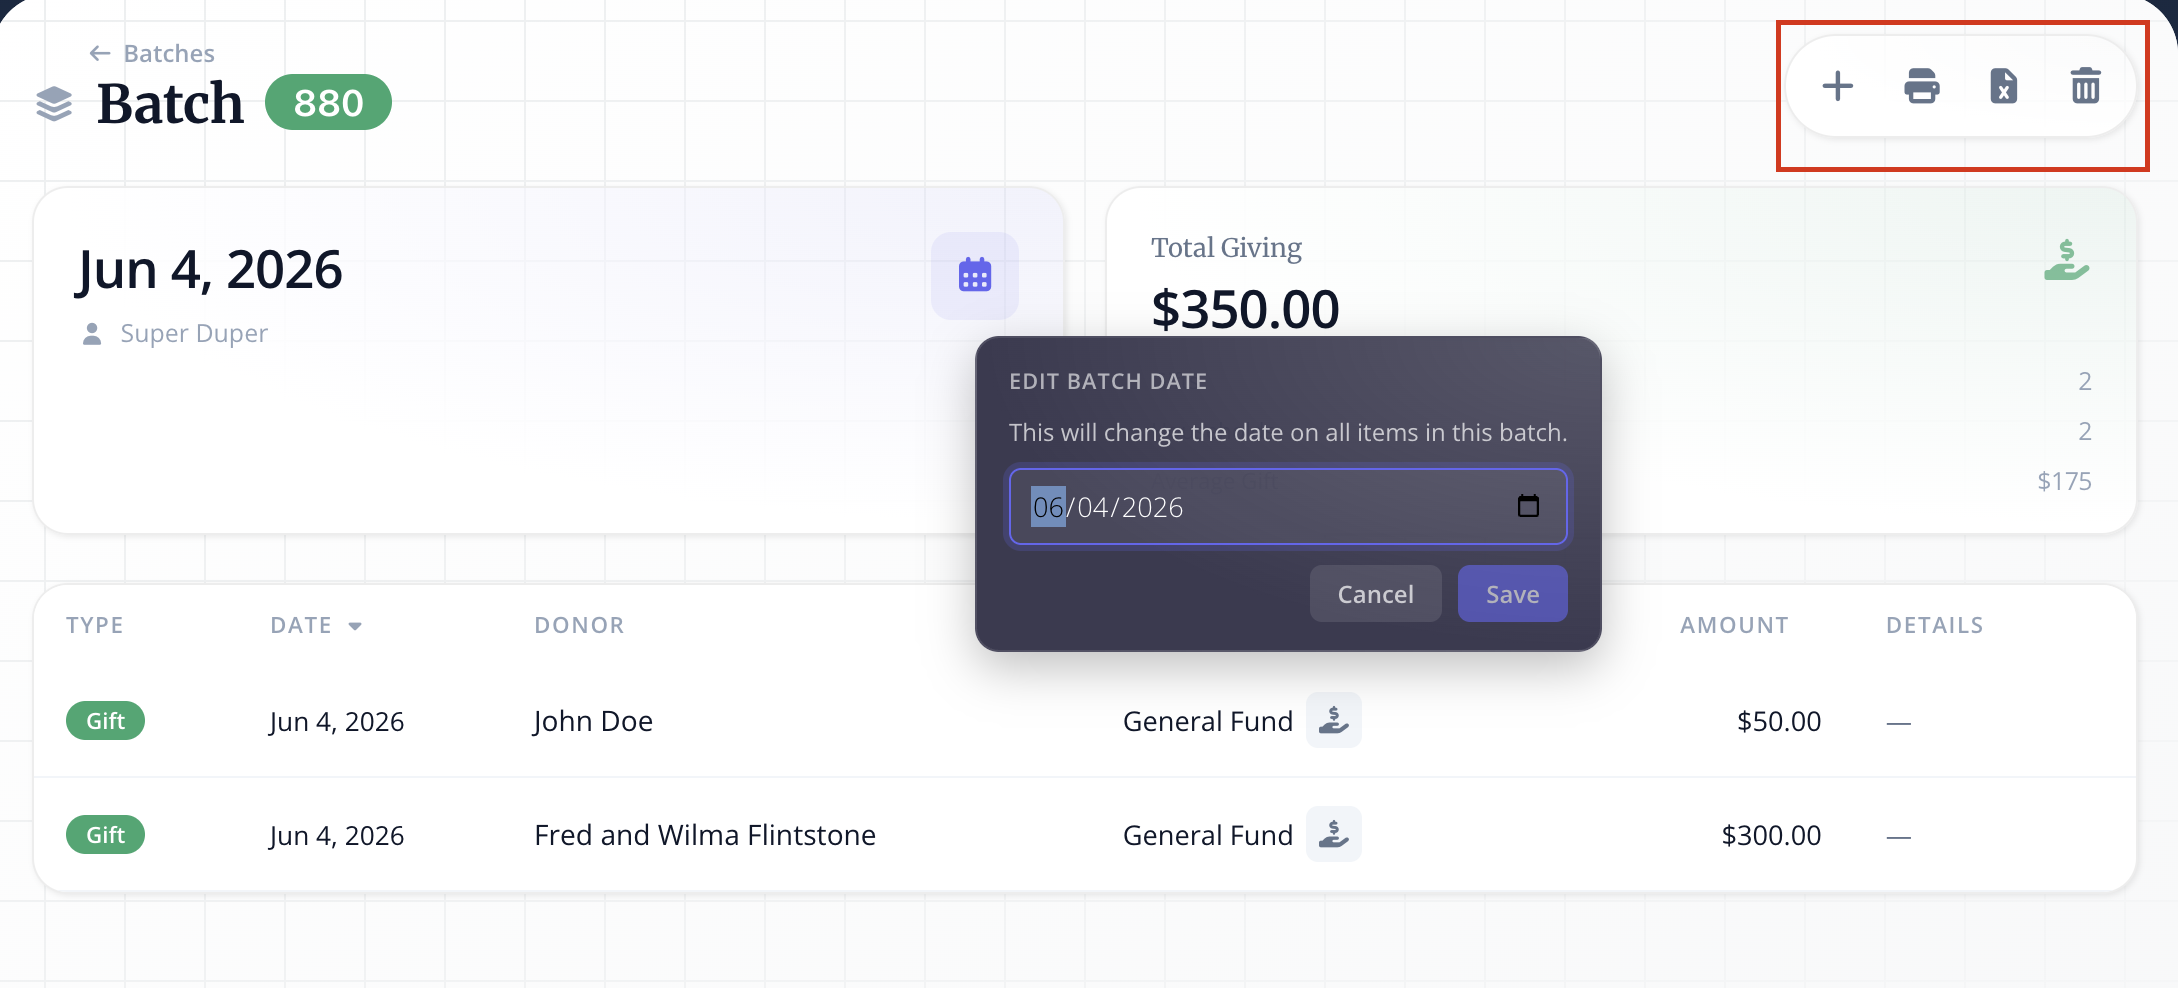
Simply open the batch you would like to edit. From there, you can click the Calendar icon to edit the date, the Plus Sign to add a new gift, or the Trash Can icon to delete the entire batch.
Editing a batch entry within a member's profile
To edit an entry on a member's profile, go to their profile and select the Giving tab. From there, adjust the dates (if needed), and then select the pencil icon next to the entry. From there, a menu will appear where you can edit that member's donation from the batch.


You can edit the date, payment method, amount given, reference number, fund(s), and memo line for a batch entry. To delete the entry entirely, select the Trashcan icon.
Splitting Transactions
When adding individual gifts from a household's profile, you can easily designate multiple funds for a single gift.
After opening the household's profile, select the Giving tab and click the green Record a gift button. From there, click Add another fund to select up to five different fund designations. Enter the amounts and click Save!

Have more questions about entering batches on Flocknote? Our team is standing by to assist! Reach out at help@flocknote.com
Classic Add Gifts in Batches
While you can add individual gifts via the Giving tab of individual member profiles, you can add gifts for multiple members in bulk batches by selecting Record Gifts under the Giving tab.
To add or review gifts in bulk, aka in a batch, start by selecting the Giving section on the left-hand side panel. From there, you can review your existing batches by clicking Batches, or you can add new gifts in bulk by clicking Record Gifts
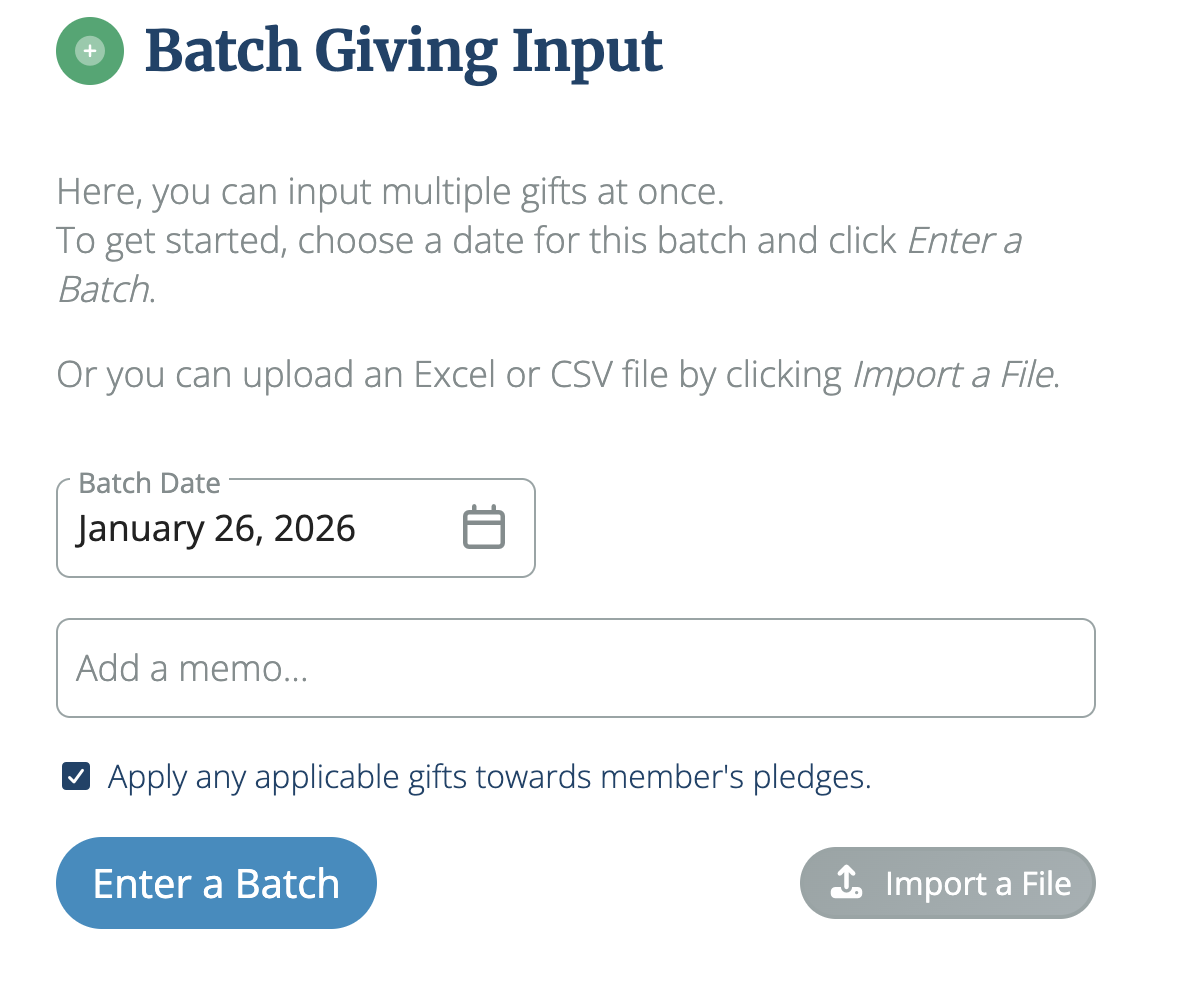
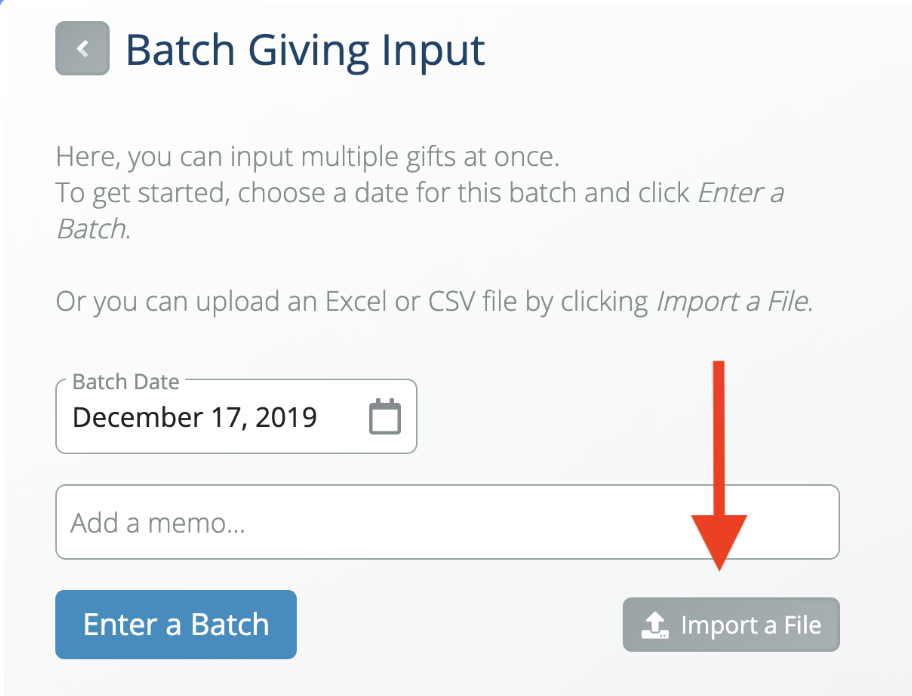
- First, select the date by clicking the Calendar icon in the Batch Date text box.
- If any of the gifts in the Batch fulfill a pledge, select the box next to Apply any applicable gifts toward the member's pledges.
- Enter a special memo (optional) for the particular batch you are starting and click the blue Enter a Batch button.
- When you are ready to add gifts, select either Enter a Batch to add gifts to a batch manually or Import a File to upload a spreadsheet of gifts. Not sure how to format your spreadsheet? Click here!
If you are entering gifts manually and select Enter a Batch, you'll arrive on the input page. Once there, type in the various text boxes to add info. You can input by envelope # or locate specific member profiles by typing out their names until a dropdown appears. When searching for a member by name, you'll see a preview that features the names of the Head of Household(s), envelope number, and mailing address (if on file). Click the preview to enter that person's data into the box.
Be sure to select the Fund you would like to designate each gift for. Click Add another fund to select another fund to designate this gift for. You can designate up to five different funds per gift.

Enter the amount for each designated fund and click the Caret "v" icon to open the dropdown and select which payment method was used.

- Make sure to click the green Save button after each input and then the green Complete button when done with your batch.
What if an Envelope Number isn't in Flocknote yet?
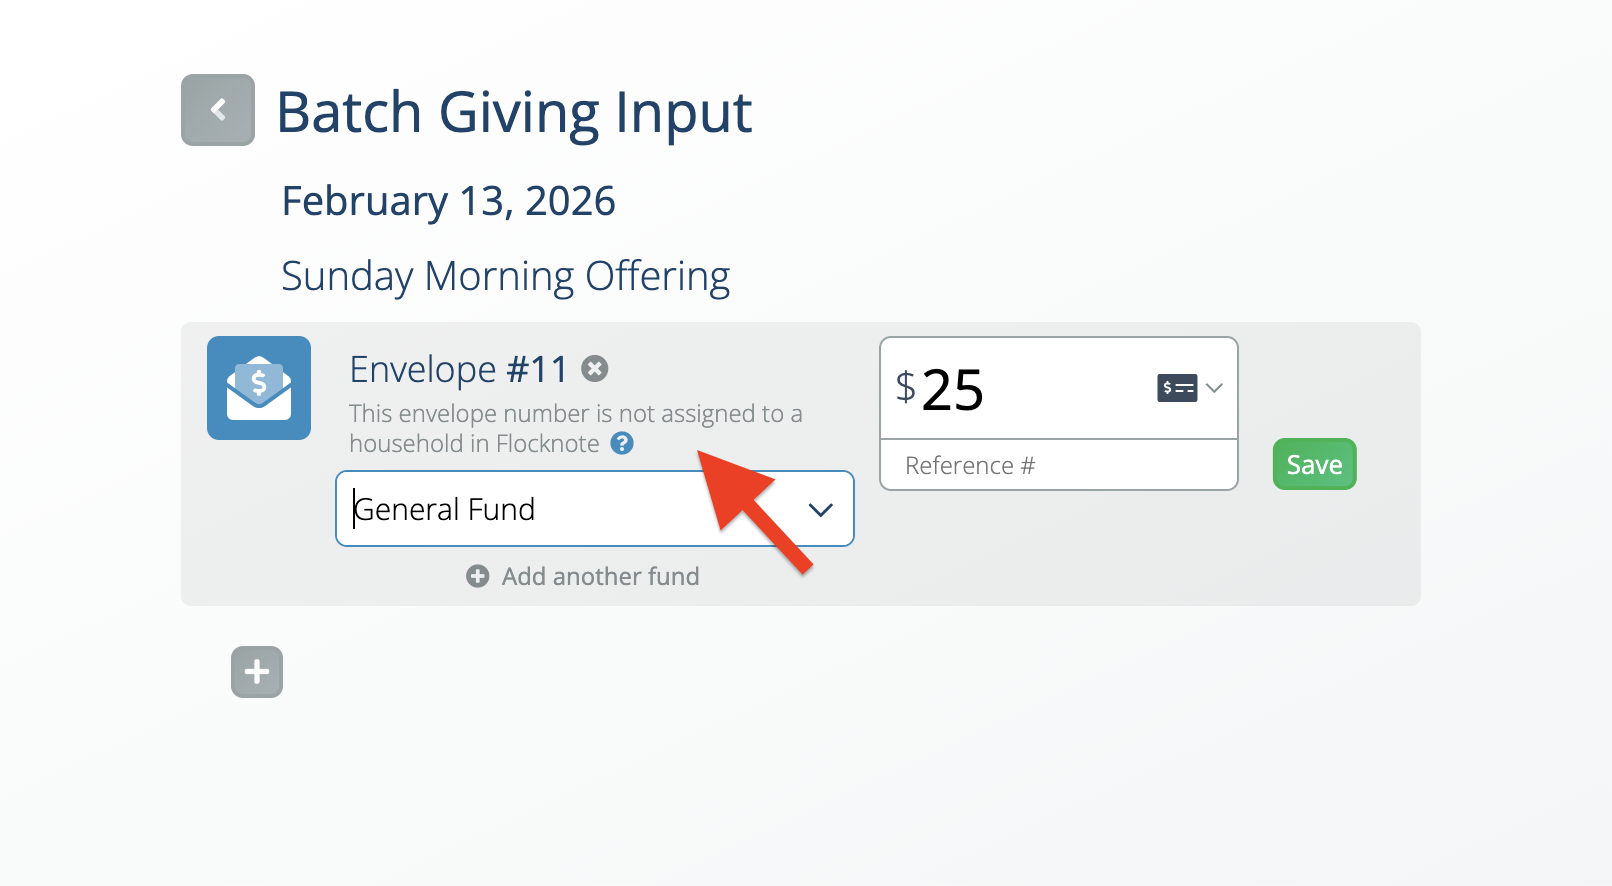
When entering a batch manually, if you enter an envelope number that has not yet been assigned to a member inside Flocknote, an "Unassigned Gift" alert will appear. To avoid confusion, you'll want to square these gifts away before running giving reports or generating Tax Summaries. The good news is that you can get these unassigned/floating gifts added to the right members' profiles in minutes!
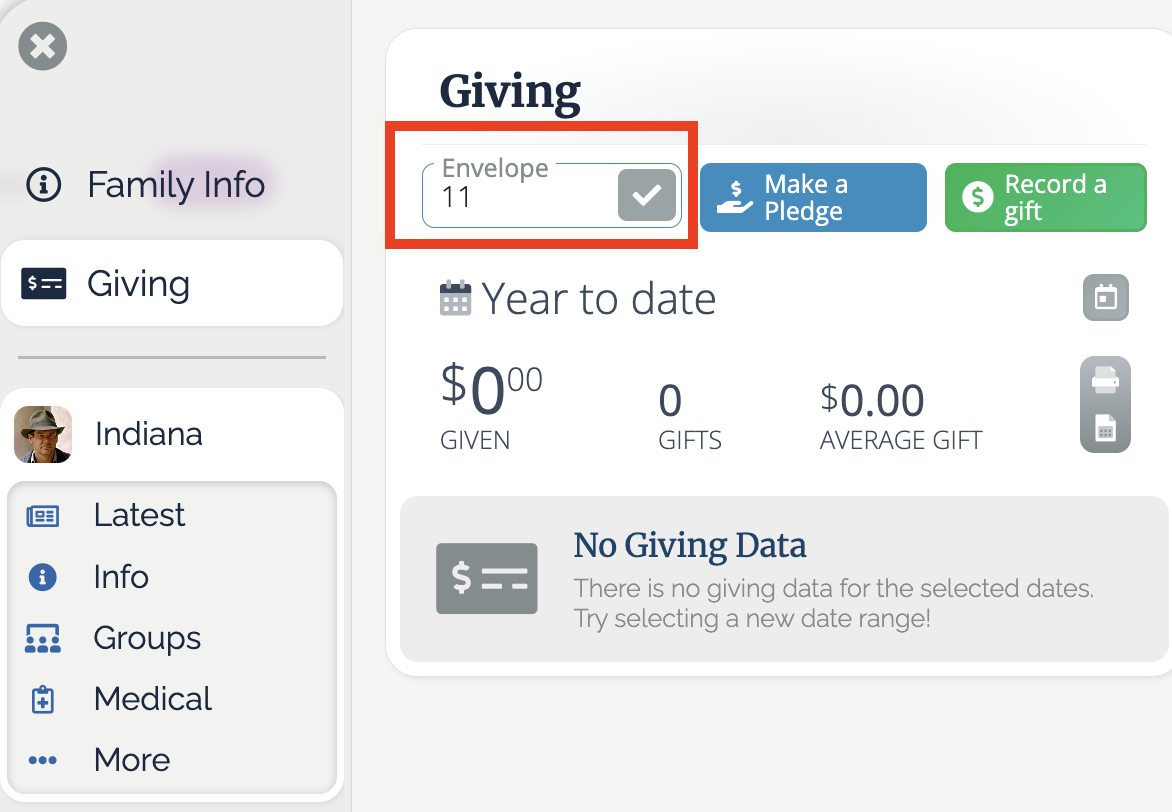
First, if the member/household that the envelope number belongs to is not yet in Flocknote, you'll need to add the member(s) to Flocknote and then group them in a household (if applicable) before continuing. Or if the member or Household is in the Flocknote system already, you can search for them on the People tab of the Everyone group. Once you have the member/household pulled up, open up the Giving tab of their profile. Click the grey Envelope Number box to open up a text box. Next, type the envelope number into that text box and click the check mark to save!
Since there are unassigned gifts attached to the envelope number, you'll see this pop up. Click OK.
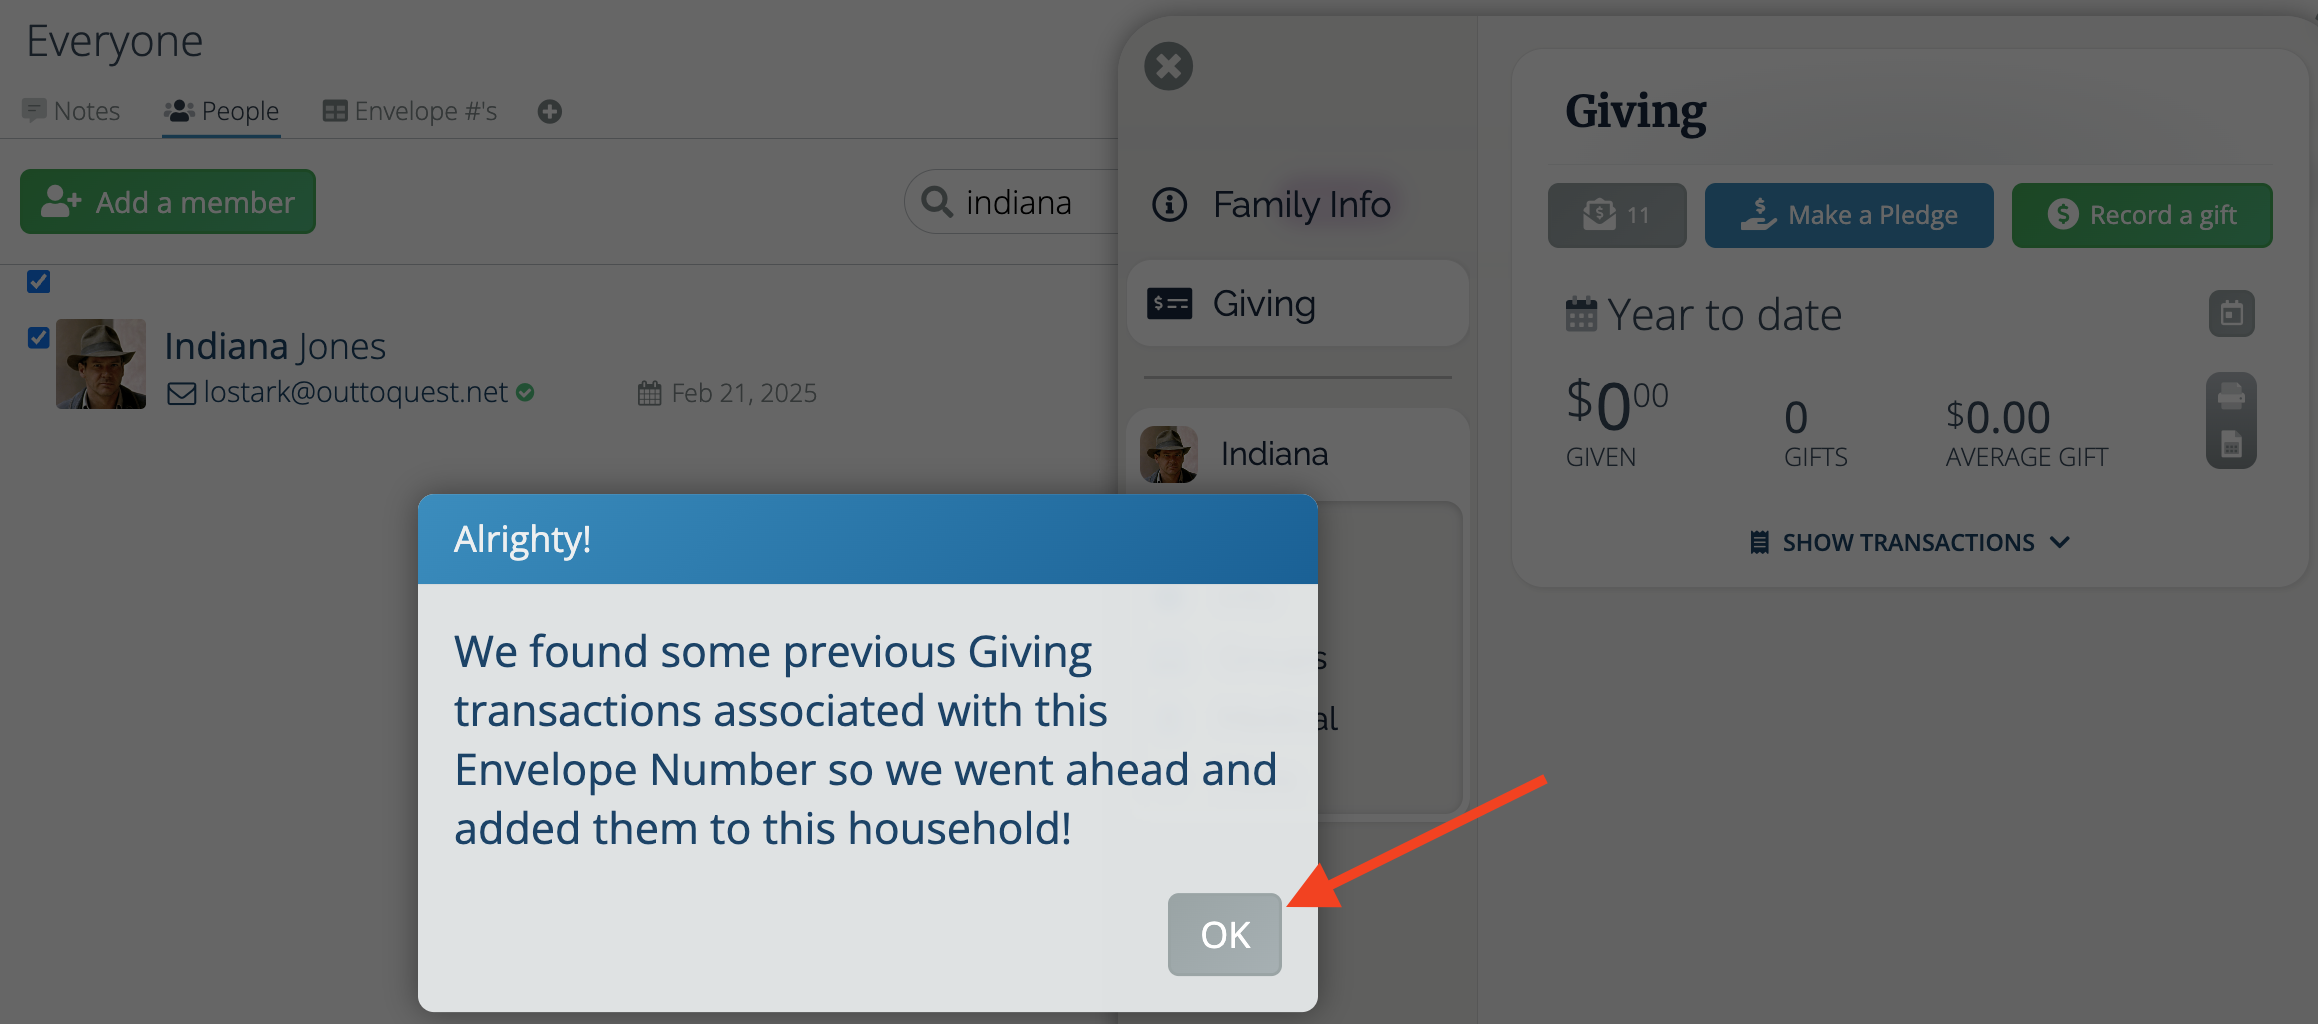
This will attach that envelope number and any unassigned gifts attached to it to the household, and you are all set 🎉

Import Gifts via a Spreadsheet
If you decided to import gifts, upload the file (in CSV or .XLSX format) from your computer (see example below). Please note that the only columns needed are envelope number, fund designation, and the dollar amount given. You can also have a column for payment type and specific dates. You can also set it as one date by adjusting the Batch Date (see picture above).
We recommend formatting your spreadsheet like this:
If you've already added envelope numbers to all members' profiles that you're importing gifts for, your spreadsheet can look like this:
🚨IMPORTANT NOTE: Giving data is recognized by envelope number. If you have not added envelope numbers to member profiles, you will need to format your spreadsheet with an envelope number column + an email address column to identify the number and tell the system to add that envelope number to their profile. If you import data for an envelope number that does not yet exist in your network and you do not include an email address to attach it to, the data will not be added to a profile until that specific envelope number has been assigned. Once it's assigned, all historical imports with that envelope number will be added to that specific member's profile or household at that time.
Edit or Delete a Batch
We all make mistakes! We've made it so you can easily edit the date of a batch, add more gifts to a batch, or delete a batch altogether.
Simply open the batch you would like to edit. From there, you can click the Calendar icon to edit the date, the Plus Sign to add a new gift, or the Trash Can icon to delete the entire batch.

Please note: Only the batch creator can edit the date of a batch. The date of imported batches cannot be edited.
Editing a batch entry within a member's profile
To edit an entry on a member's profile, go to their profile and select the Giving tab. From there, adjust the dates (if needed), and then select the pencil icon next to the entry. From there, a menu will appear where you can edit that member's donation from the batch.
You can edit the date, payment method, amount given, reference number, fund(s), and memo line for a batch entry. To delete the entry entirely, select the Trashcan icon.
Splitting Transactions
When adding individual gifts from a household's profile, you can easily designate multiple funds for a single gift.
After opening the household's profile, select the Giving tab and click the green Record a gift button. From there, click Add another fund to select up to five different fund designations. Enter the amounts and click Save!
Have more questions about entering batches on Flocknote? Our team is standing by to assist! Reach out at help@flocknote.com