Keep your groups organized and up to date with Smart Groups!
This help guide is for Super Admins only because they are the only ones with the privilege to create groups (including Smart Groups) or filter the Everyone group. If you are a Group Admin or a Note Sender, you will need to contact the Super Admin(s) of the account to create Smart Groups for you and set you up as the Group Admin for those Smart Groups, if necessary.
The life of the church is never stagnant! —New volunteers, new students, new donors—all working together to bring your mission to life. You told us you need a better way to keep up with these changes. Well, you asked and we listened! Sound the trumpets! Introducing our new feature, Smart Groups. 📣
In this Article:
Need inspiration? Check out some common use cases for Smart Groups HERE!
What is a Smart Group?
Smart Groups is a tool that makes organizing and updating your groups effortless. With Smart Groups, you can create dynamic groups, based on any Flocknote filter, that *automatically* update themselves based on the criteria you set. As people meet or no longer meet your chosen filters, they’ll be automatically added or removed—keeping your groups effortlessly up-to-date. Easy peasy! No more manual updates, no more scrambling, and no more stress!
💎With Flocknote Complete, you'll get unlimited Smart Groups included at no extra cost. Still on the Starter plan? You can create up to 5 Smart Groups to explore what’s possible, and then upgrade anytime to unlock the full power of our all-in-one software. Don’t worry—regular groups are unlimited on all plans!
💎Additionally, with Flocknote Complete, you have the ability to filter by even more criteria, such as address, household status, class year, proxy contacts, etc.
Create a New Smart Group:
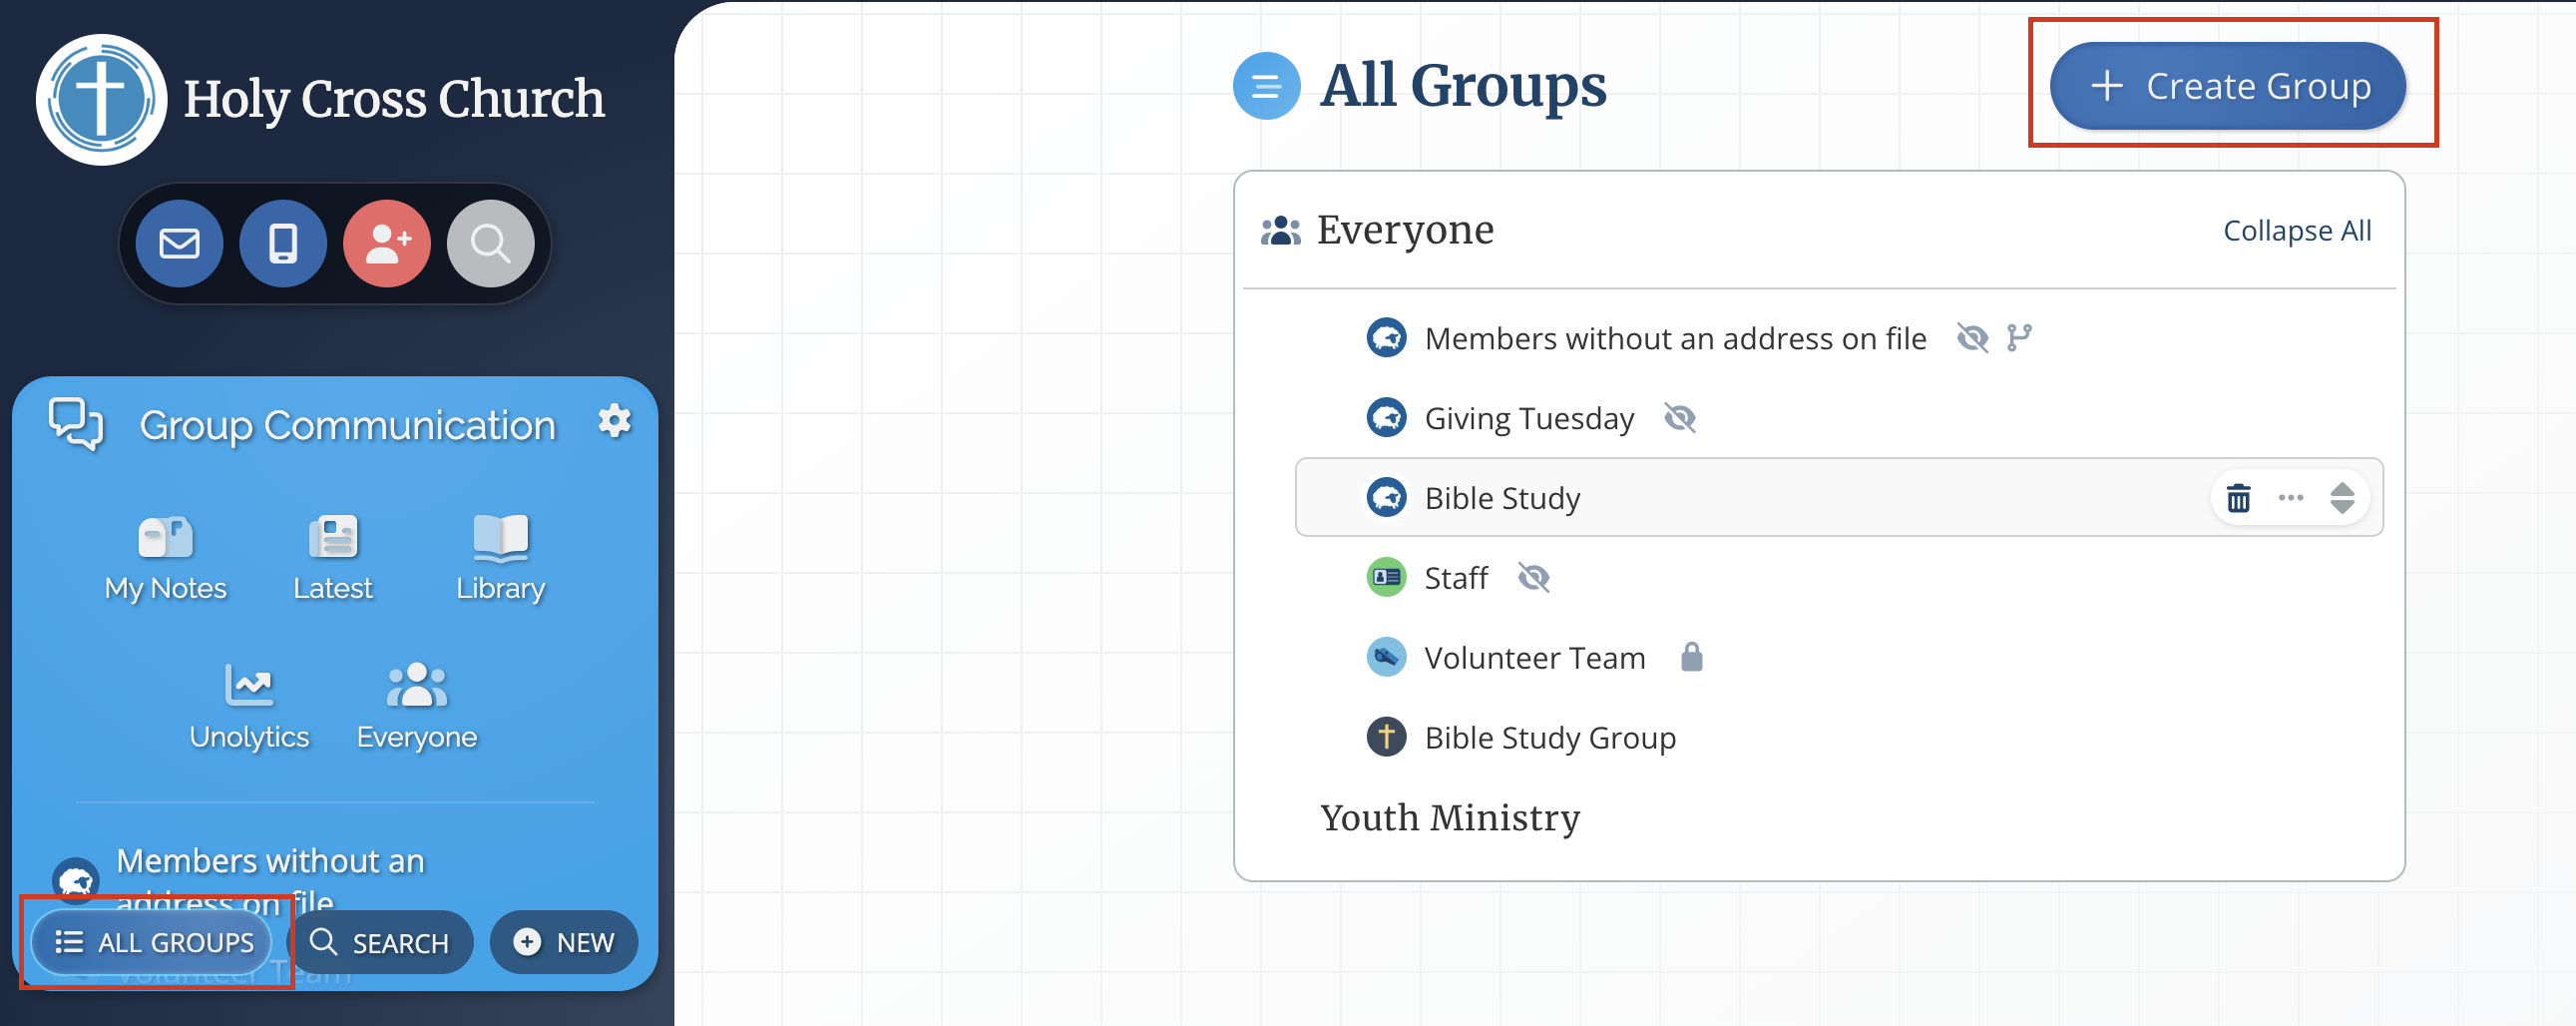
- Select the Group Communication tab, and then click All Groups
- Once on the All Groups page, select + Create Group
- Then, click the blue New Group button within the gray Manage your groups pane that pops out.
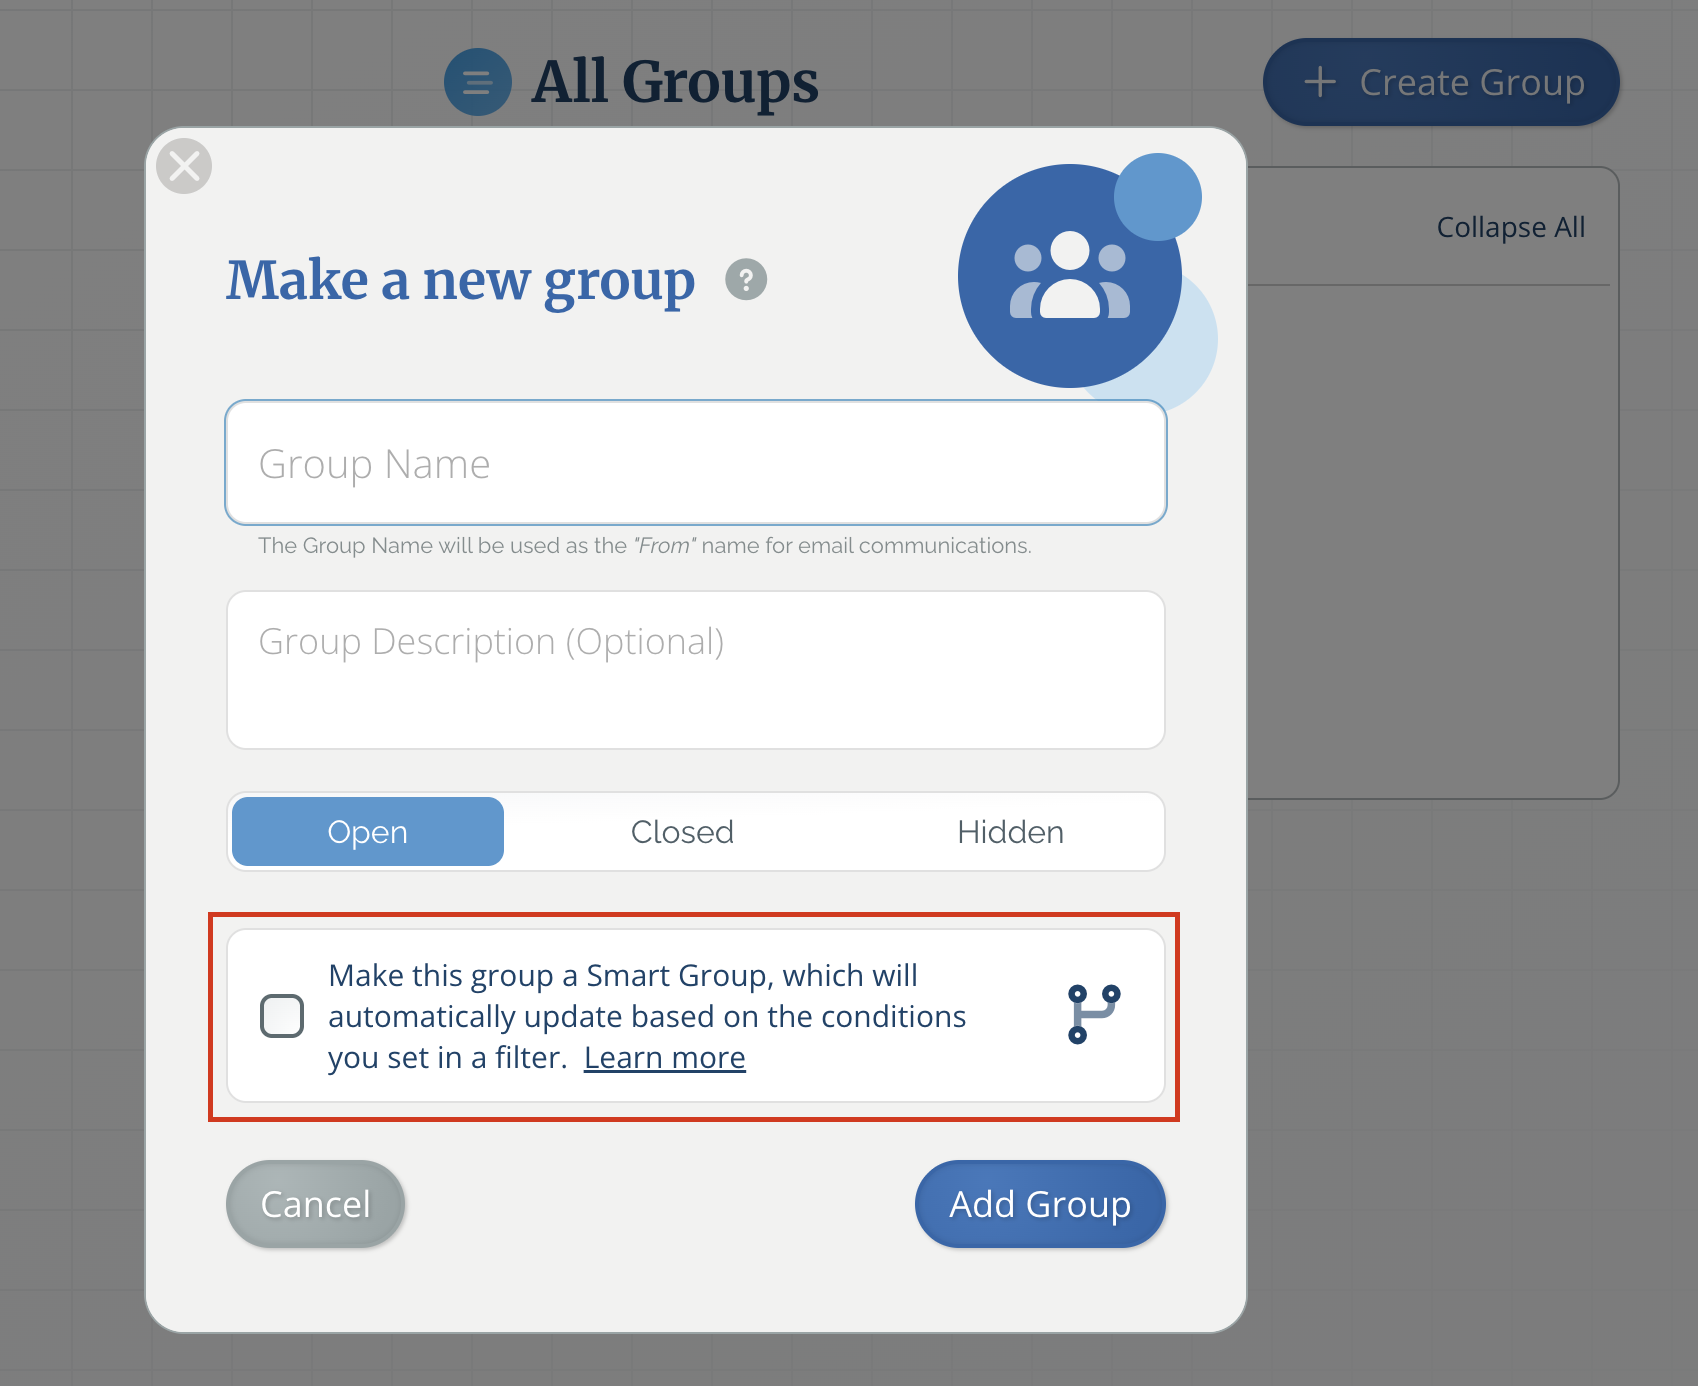
- You can then name the group, add an optional description, and adjust the settings (open, closed, hidden).
- Then check the box below the settings options to make this group a Smart Group. Lastly, select Add Group.

- A pop-up will automatically slide over from the right-hand side for you to start building out your Smart Group by clicking the Select A Filter button.

- You can now sort your members within the Everyone group based on certain criteria and, if needed, construct an "and/or" filter to further narrow down your search. You can use the filters you already know and love to create a dynamic Smart Group! You can filter for:
- Preferred language
- Registered Members
- Members whose email addresses are unverified
- Current Donors
- Members who don’t have a recurring donation set up (yet!)
- All new members
- Members who have missing contact information
- And so much more!
- Once you’ve selected all the criteria you’d like to filter by, select the green Save button. You’ll notice your Smart Group immediately populates with members filtered from your Everyone group that meet the criteria you set. 🎉
Helpful tip - If you cancel out of creating a Smart Group, the group will be made a standard group.
Note - Just like a standard group, you can create and set a Welcome Message to be sent to new members of your Smart Group. ✨
- If you have set up a Welcome Message on an existing standard group and then turn that group into a Smart Group, that same Welcome Message will remain and be sent to new members.
- Smart Group Welcome Messages are sent out once every 24 hours via an automated process. That means it could take up to 24 hours for new members to receive a Welcome Message from a Smart Group.
Make an existing standard group into a Smart Group:
- Click into the standard group you’d like to convert into a Smart Group.
- Select the cogwheel at the top right corner.
- Select Make this a Smart Group.

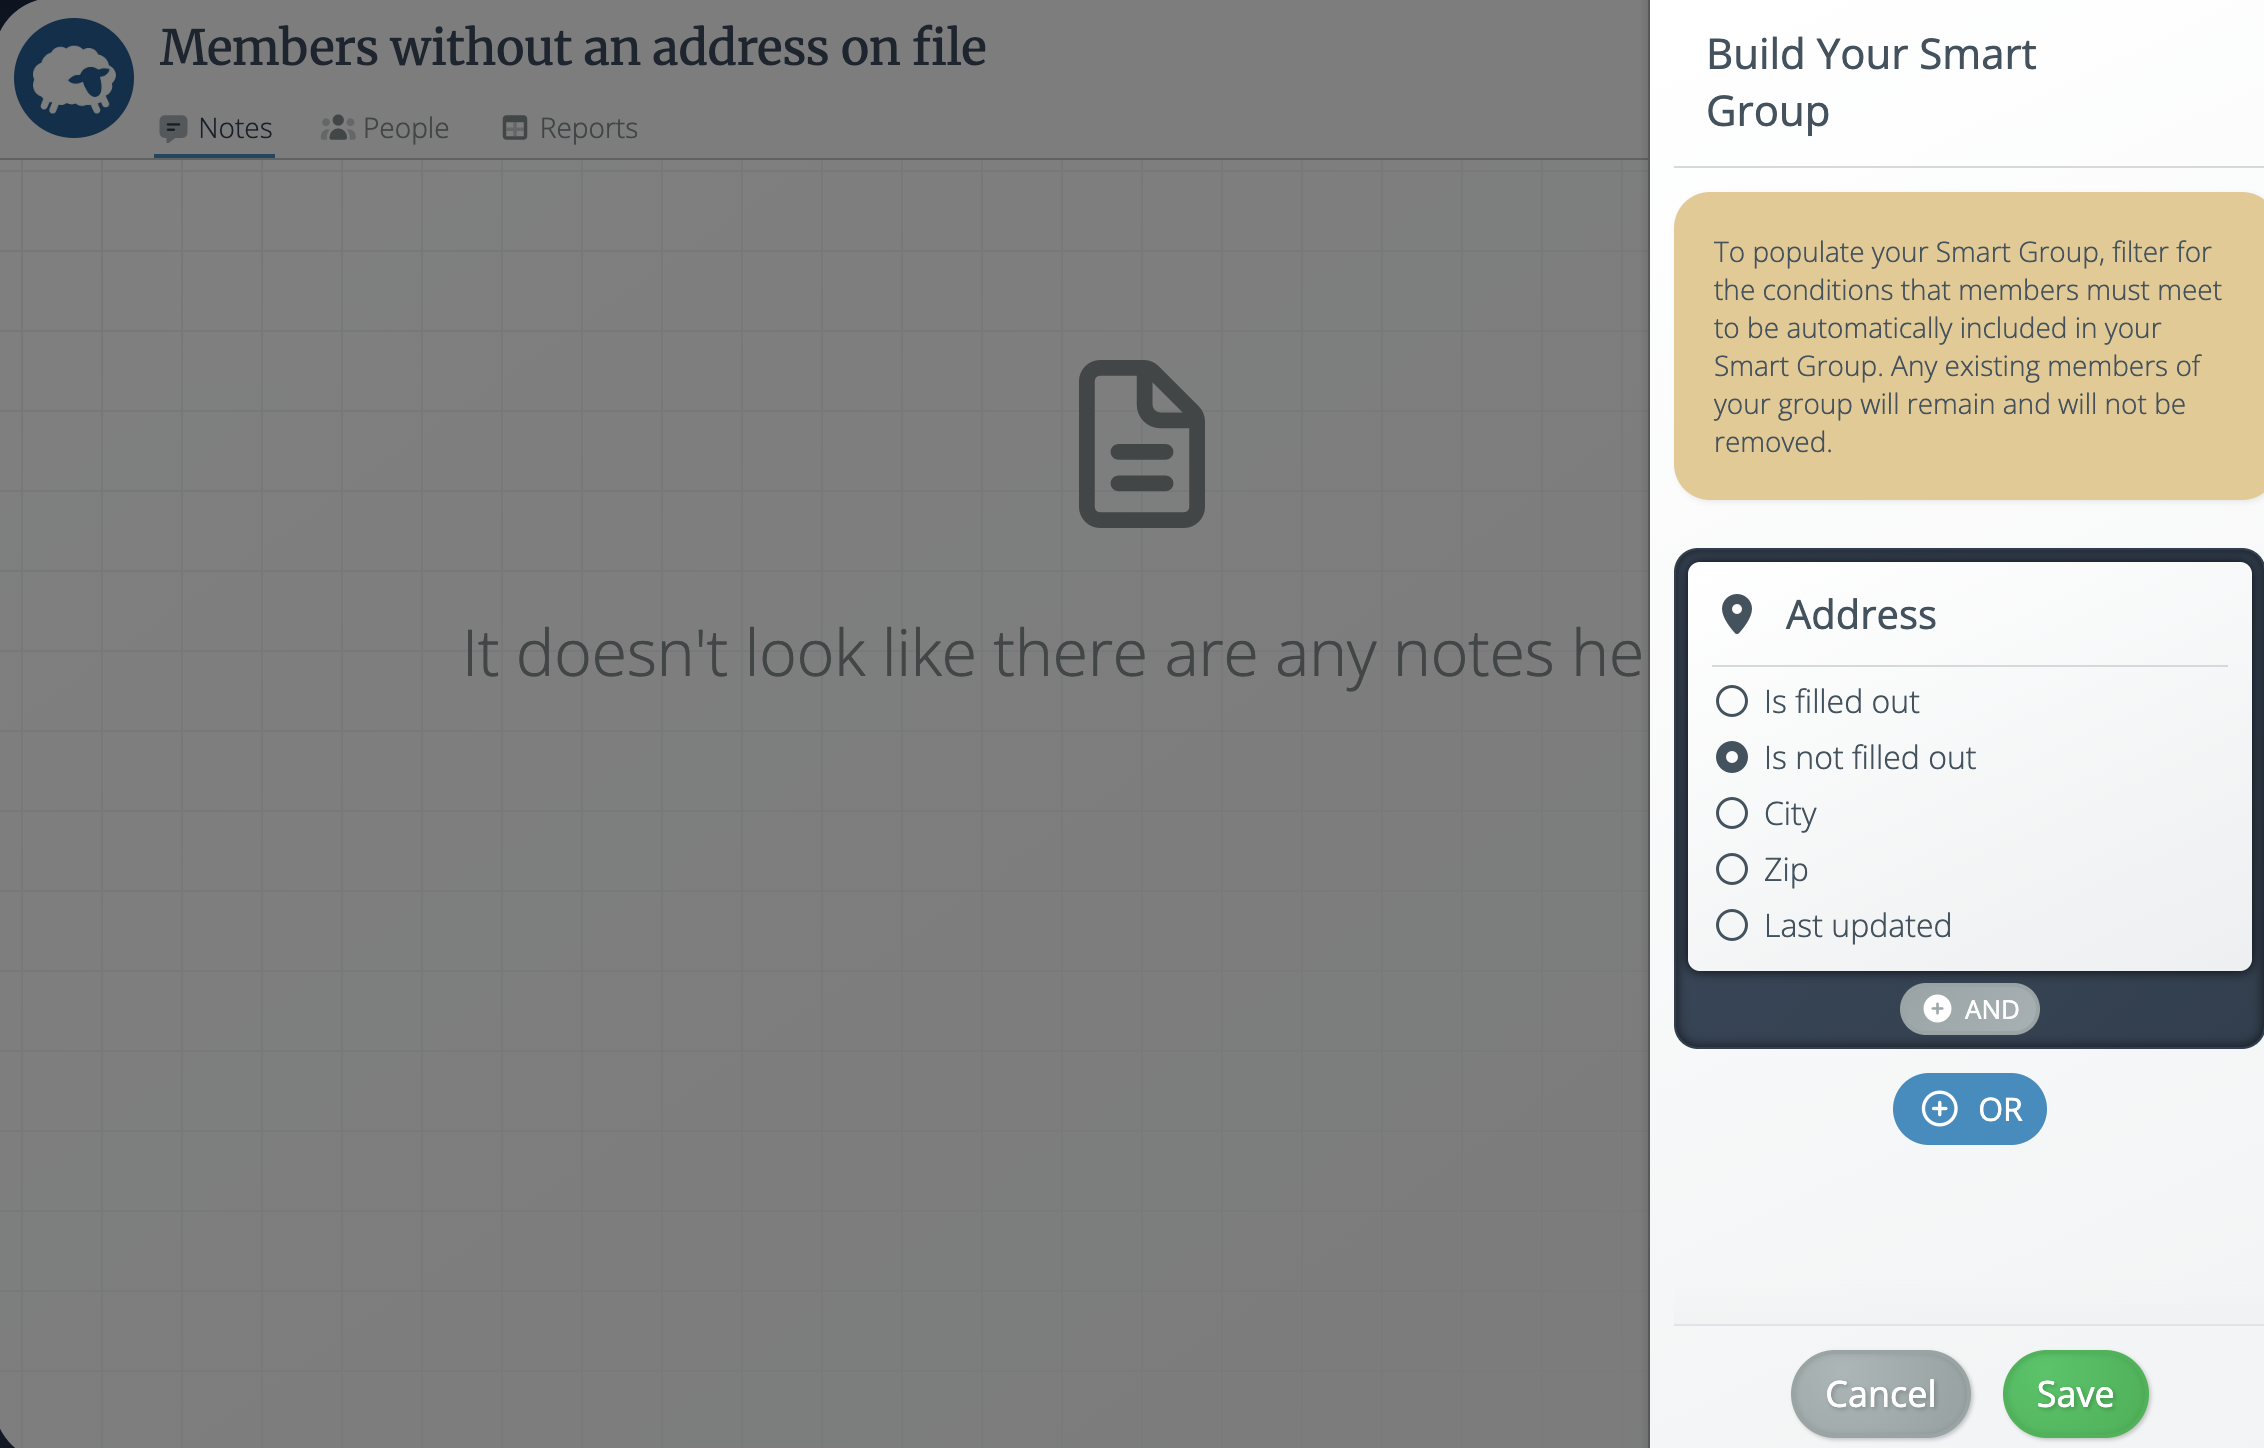
- A pop-up will automatically slide over from the right-hand side so you can start building out your Smart Group by clicking the Select A Filter button.
- To populate your Smart Group, filter for the conditions that members must meet to be automatically included in your Smart Group. Any existing members of your group will remain and will not be removed.
Helpful Tip - Smart Groups maintain the same privacy setting (i.e. open, closed, hidden) as the standard group it was created from. (ex: if your standard group was an open group, the Smart Group will be an open group). You can edit the privacy settings at any time.
Pro-tip - You will know your group is a Smart Group when you see this icon next to the group name on the left-hand sidebar. You will also know by hovering your cursor over the icon and seeing “Smart Group” pop up.

You will see the Smart Group icon next to those members whose names are filtered in. There will be no icon next to members who:
- Already existed in the group
- Who joined an open Smart Group (regardless if they meet the filter criteria or not)
- Who were added manually by Admins (regardless if they meet the filter criteria or not)

Create a Smart Group straight from the Everyone group:
- Click the purple Filter button within the Everyone group's Search bar
- Select what you would like to filter by from the drop-down (i.e. Personal Info, Contact Info, Groups, etc.)
- If needed, construct an "and/or" filter to further narrow down your search.
- Once you’ve selected all the criteria you’d like to filter by, select the purple Actions button at the bottom right-hand side of your screen.
- Select the Create a Smart Group button.

- Give your Smart Group a name, an optional description, and then label it as an open, closed, or hidden group.
- Lastly, click Add Group, and voila, you have created a Smart Group!
Helpful Tips:
✨You can’t remove a member from a Smart Group when they match the group's filter criteria. However, you can turn off the member's notifications instead.
✨You can add members manually to a Smart Group (even if they don't match the criteria). You will notice that they do not have a Smart Group icon next to their name. You are also able to remove those members that have been added manually from the Smart Group at any time.

Edit a Smart Group:
To edit the criteria/filters that are set for a Smart Group, simply
- Click the desired Smart Group on the left-hand sidebar.
- Click the gray cogwheel icon in the upper right corner of the screen.
- Select Edit Smart Group from the dropdown.
- Once you update the filters on the Smart Group, click the green Save button at the bottom of the screen and your filters will be reflected in the Smart Group. Those members who no longer meet the new criteria will automatically be removed.

Delete a Smart Group:
- Click the gray cogwheel icon in the upper right corner of the screen.
- Select Group Settings from the dropdown
- Click the Delete Group button

Here are a few more use cases for Smart Groups:
- Notify women in your community about an upcoming Women's Retreat.
- Keep top donors informed about big projects and initiatives.
- Send updates to your teachers in schools or Religious Education.
- Keep track of Volunteers who have completed Safe Environment Training. Tutorial HERE.
- Share policy updates with fellow Flocknote admins, grouped by roles or privileges.
- Let anyone interested in volunteering know about upcoming opportunities.
- Create a group of everyone who is 18+ in your network, see how with a tutorial HERE.
- Thank this year’s donors, all without updating a list!
- Find members with missing information in a jiffy, see how with a tutorial HERE.
- ...the possibilities are endless!
- Have questions or want to brainstorm? We're here to help – email us at help@flocknote.com.